Thursday, 14 January 2016

Loaded Pita Bread with Chicken, Hummus, Feta Cheese and Greek Salad


This loaded pita bread is a cross between a pizza and an open faced sandwhich...the pita bread, hummus, chicken and feta cheese are baked and warm, while the Greek salad and basil yoghurt are cold.

This was inspired by the baby cucumbers and red peppers I had, as well as the little bit of remaining plain Greek yoghurt. I knew that there was some pita bread in the freezer, and instead of making pita chips with it (my original plan) I decided to use it as the base for the whole meal of Greek chicken, salad, hummus and yoghurt.

My husband made the hummus, adding in the last large red pepper that he roasted, peeled and chopped.


Marinate 3 boneless, skinless chicken breasts for at least an hour, in:

The juice of half a lemon
2 tablespoons oil from sundried tomatoes
Pinch of chili flakes
1/2 teaspoon crushed fennel seeds
2 cloves garlic, minced
1/2 teaspoon chopped fresh rosemary


Cook the chicken breasts in a pan over medium high heat, until cooked through. No oil is needed, as there is enough oil in the marinade to prevent it from sticking.

When the chicken is cooked, remove it from the heat and allow it to rest for 10 minutes.


While the chicken is resting, make the basil yoghurt by combining:

1/2 cup plain Greek yoghurt
1 heaped tablespoon chopped fresh basil
1 teaspoon olive oil
salt and pepper to taste


Set the yoghurt aside until serving time. Prepare the Greek salad for the topping by dicing cucumber, red peppers and grape tomatoes.  Crumble some feta cheese. Thinly slice the cooled chicken. Heat the oven to 350F. Now it's time to assemble the pita breads...


Place the pita bread onto a baking sheet and spread a layer of hummus over the bread.


Place a layer of thinly sliced chicken on top of the hummus, and sprinkle some crumbled feta over the chicken.

Place the topped pita breads into the oven and bake until everything is hot.


Place a loaded pita bread onto a plate, and top with a generous mound of chopped peppers, cucumbers and grape tomatoes.

Sprinkle a bit more crumbled feta over the Greek salad.


To serve, add a dollop of the basil yoghurt on top of the Greek salad. These can be messy to eat, but that's part of the fun!


  • I turned the usual meal of Greek chicken, hummus, tzatziki, Greek salad and pita chips into one item by loading it all onto the pita bread. The other alternative is to warm the pita bread and fill it with the other ingredients, either by rolling it wrap style or stuffing the pita pocket.
  • I chose to make a basil yoghurt for the cool freshness it would provide; it was a substitute for the usual tzatziki. 
  • Other herbs that work well in Mediterranean inspired food are oregano, rosemary, thyme, parsley.
  • My husband usually makes the hummus in our house, and likes to add in roasted red pepper. Purchased hummus can be used if you choose. Tapenade can be used instead if you prefer.
  • Other meats can be used, try prawns; firm fish such as salmon or cod; pork; lamb; meatballs or cooked sausage; leftover chicken.
  • The Greek salad has no dressing; the yoghurt and the creaminess from the hummus take care of that. A drizzle of olive oil and fresh lemon juice can be added just before serving if you wish.
  • Thinly sliced red or green onions, olives, whole chick peas can be added into the salad for added texture and flavour.
  • When marinating the chicken I used the olive oil that my sundried tomatoes are stored in; you can choose to use just olive oil, or even a flavoured olive oil. 
  • Add lemon zest to the marinade to increase the intensity of the lemon. The addition of crushed fennel seeds adds a hint of licorice, but can be omitted.

Saturday, 9 January 2016

Three Cheese Baked Eggplant with Pesto and Smoked Tomatoes


I am the first to admit that I am not the biggest eggplant fan; I can handle small amounts, in pasta sauces, dips or moussaka, but I've never even dared to try Eggplant Parmesan! So when the eggplant in the fridge started to call my name I decided to try out a version of Eggplant Parmesan. In case I couldn't handle that much eggplant, I also made turkey meatballs...

I was very pleasantly surprised at how good the eggplant was and could quite easily have done without the meatballs. I'm looking forward to heating the leftover eggplant up for lunch today.

While getting things like Parmesan and eggs out of the fridge, I decided to use the Basil Pesto and ricotta cheese that were in there, and at the assembly stage added in the goat cheese. I had a freshly made batch of Basic Tomato Sauce , and set some aside for dinner. The rest was put into the freezer, and that's when I discovered some smoked tomatoes...a pleasant surprise as I thought they had all been eaten.

Needless to say, the Eggplant Parmesan evolved over the course of the day, but I was incredibly happy with the end result. Crisp outside, soft inside, full of flavour!

Start off by slicing one eggplant into 3/8" thick rounds. Lay the slices out on the counter and salt both sides; the excess salt will be rinsed off before baking.

Place the slices into a colander and leave for at least an hour.

This process will remove any excess moisture, but it will also help to remove some of the bitter taste that eggplant can have.


The eggplant is ready to proceed with once you see droplets of moisture beading on the flesh.

Rinse each slice off under cold running water.


Cover a baking sheet with a layer of paper towel and place the eggplant slices onto this. Cover with a second layer of paper towel and gently pat the eggplant dry.


Turn the oven on to 400F. Lightly grease a baking sheet, using olive oil.


Bread the eggplant as follows:

First coat each piece in flour seasoned with salt, black pepper and cayenne pepper. Dust off any excess flour.


Then place the flour coated eggplant into a mixture made of:

 1 egg, beaten with 1/4 cup milk.


Lastly, place the eggplant into breadcrumbs that have been seasoned with salt and black pepper, and have a good handful of grated Parmesan mixed in.

Lightly press the breadcrumbs and cheese to make sure they adhere to the egg wash.


Place the breaded eggplant slices onto the prepared baking sheet, keeping them in one layer with a bit of space in between so that all surfaces of the eggplant can crisp up.

Drizzle the top of the eggplant lightly with olive oil.


Bake until golden and crisp on the outside, and tender on the inside. This took 20 minutes.

Remove from the oven and allow to cool before assembling the dish.


While the eggplant is baking and cooling, prepare the rest of the ingredients. Turn the oven temperature down to 350F.

You will need:

2 cups  Basic Tomato Sauce
Crumbled goat cheese
Extra grated Parmesan
6 peeled, seeded and chopped smoked tomatoes


 For the filling, combine:

1 cup ricotta cheese
1 heaped tablespoon Basil Pesto
Salt and black pepper
1 egg


Spread the Basic Tomato Sauce over the bottom of an ovenproof dish. Sprinkle the chopped smoked tomatoes evenly over the top.


Place half of the baked eggplant rounds on top of the tomato sauce.

Spread a layer of ricotta cheese over each one, using about half of the mixture in total.

Crumble some goat cheese over the ricotta.


Place another baked eggplant round on top of the first and divide the remaining ricotta mixture between the stacks.

Add some more crumbled goat cheese and a pinch of grated Parmesan.


Bake until heated through. The  Basic Tomato Sauce will be bubbling, and the cheese on the top will be golden.


Serve the baked eggplant stacks with extra, warmed Basic Tomato Sauce if you wish (we tend to like more sauce). I also served turkey meatballs on the side.


  • For a non-eggplant fan, this is the perfect way to introduce it into your diet. My head is now spinning with ways to expand on this recipe...
  • I used an Italian globe eggplant, which is probably the most commonly known type. there are so many different varieties out there, if you can get hold of some of them, give them a try. I did use some mutli-coloured baby varieties in the post  Moussaka with Chicken and Grilled Baby Eggplant, and I was surprised at how different they all tasted. 
  • Smaller varieties of eggplant do not always need to be salted before cooking, but if you are not sure, it won't hurt anything to do so. The excess salt gets rinsed off. I also go lightly on salt in other parts of the recipe just to be sure...nothing worse than something that is too salty. More salt can always be added at the table if you feel it is needed.
  • This method of cooking the breaded eggplant avoids pan frying the eggplant, but still achieves a golden, crispy crust. Eggplant acts like a sponge, and tends to absorb a lot of the oil if you are pan frying it. 
  • The breadcrumbs can be seasoned with chopped fresh herbs such as parsley, oregano, rosemary or chives; spices such as cayenne pepper, crushed fennel seeds or garlic powder; minced fresh garlic or green onions; finely ground nuts such as pine nuts or almonds.
  • I added cayenne pepper to the flour as I wanted to add a bit of heat, and it worked really well. The heat was there in the background, not overpowering everything else. Hot sauce can be used in the milk and egg instead.
  • Dijon mustard can be whisked into the milk and egg, lemon zest is another option.
  • I would like to try mixing chopped fresh spinach and basil into the ricotta cheese next time. Other suggestions include roasted red peppers, grilled and chopped eggplant (a great way to use the smaller end slices).
  • I made one stack with no goat cheese, for my daughter who doesn't like it; I used grated mozzarella instead. Sliced fresh mozzarella could be used too.
  • Smoked tomatoes are optional. Peeled, seeded and chopped fresh tomatoes can be used instead. Chopped canned tomatoes or roasted cherry tomatoes can also be substituted.
  • The eggplant stacks can be assembled ahead of time and baked when you are ready. I prepared everything a few hours ahead and then assembled the eggplant stacks while I waited for the oven to heat up.
  • Next time you are having burgers, consider using some of these breaded and baked eggplant rounds as a substitute for a meat patty.

Thursday, 7 January 2016

Honey Thyme and Pink Peppercorn Chicken Kebabs on Focaccia


I've been on a bit of a sandwhich binge lately, and even though some might find it strange, we've been having sandwhiches for dinner quite a bit. They are not just a ham and cheese on sliced bread event though...I have been more inclined to make the meat and veg and use some form of bread as the starch, instead of rice, potatoes, pasta etc. The result? Filling, balanced and reasonably healthy dinner that everyone seems to enjoy.

This one allowed me to use up leftover chopped sundried tomatoes and roasted red peppers from our Salad Bar the night before, some thyme infused honey that I used to make a New Years' canape, grape tomatoes and some pink peppercorns (I am on a mission to use up all the miscellameous herbs and spices in the spice drawer; the ones that were bought for a certain use and are now just taking up space).

I made Focaccia with Caramelized Onion and Rosemary, slicing a thin layer off the top to make an open faced sandwhich.

 Two hours before cooking the chicken, cut it into bite sized pieces and marinate it in:

Juice of half a lemon
1 tablespoon honey
1 teaspoon chopped fresh thyme
1 teaspoon pink peppercorns, crushed
2 tablespoons olive oil
Pinch of salt

I used 2 boneless, skinless chicken breasts.


Make a flavoured butter by combining:

1 tablespoon finely chopped sundried tomatoes
1 tablespoon finely chopped roasted red pepper
1/2 teaspoon ground black pepper
3/4 cup softened salted butter


Spread a layer of the flavoured butter over the bread you have chosen to use. I cut a thin layer off the top of the Focaccia with Caramelized Onion and Rosemary, after cutting it onto 4" X 6" squares, one per person.

Sprinkle lightly with grated Parmesan cheese. Place on a baking sheet and set aside.


Turn the oven on to heat up to 350F.  Skewer the chicken cubes, alternating with grape tomatoes. I put 4 pieces of chicken on each skewer, so each serving was a total of 8 pieces of chicken.


Heat a frying pan that is large enough to hold the skewers. Add a small amount of olive oil, and then sear the chicken and tomatoes on all sides, turning them as little as possible.

Place the pan into the oven to finish cooking the chicken.


At the same time as the chicken is cooking, roast some asparagus.

Snap the woody ends off, lightly coating the spears with olive oil and seasoning with salt and pepper.

Roast until tender.


Put the baking sheet with the bread into the oven at the same time, so that the bread toasts and the butter and Parmesan melt.

Assemble the sandwhich on the plate: place a piece of Focaccia with Caramelized Onion and Rosemary onto the plate and top it with 2 chicken and grape tomato skewers, placing the asparagus on top of the chicken.

The idea is to squish the warm tomatoes and their juices into the bread and then dig in! A knife and fork is optional, but it certainly makes a lot less mess!


  • I made one recipe of Focaccia with Caramelized Onion and Rosemary, which allowed me to make 4 sandwhiches for dinner, and 4 more for lunch the next day (using other fillings).
  • The 2 chicken breasts made 8 skewers, which fed four of us.
  • Pink peppercorns are not technically pepper, but a berry that looks similar in size and shape to peppercorns.  They have a slight peppery flavour and bite to them, but I also find that there is more than a hint of fruitiness and lemon in the background.
  • Pink peppercorns are more delicate than true peppercorns, so they can be lightly crushed using a knife. The thin papery outside can be rubbed off and used to coat cheese or fish...place the peppercorns in a strainer and then gently rub the peppercorns against the mesh, and the fine outside layer will fall through onto a plate below. Roll your cheese or lightly press the fish into the pink dust.
  • I had first decided to grill the skewers, but by the time I started making dinner it was dark and freezing cold outside...
  • The skewers can be grilled or pan fried and served with salad, over rice or pasta.
  • Instead of chicken breasts, try pork tenderloin, beef tenderloin, firm white fish, prawns or scallops. 
  • Add other vegetables to the skewers if you like; omit the meat completely and make them vegetarian.
  • Turn this into a true sandwhich by marinating the chicken breasts whole, and then cooking and thinly slicing the meat. Layer it between slices of bread, or in a bun, with pink peppercorn mayo, goat cheese, grilled asparagus and lettuce.
  • The butter can be made from any herbs, spices or vegetables you have. I happened to have some sliced sundried tomatoes and roasted red pepper. Finely chop the additions and mix well with softened butter. I used salted butter; if you use unsalted butter you will need to add salt.
  • The chicken can be marinated the day before. It can also be skewered ahead of time, and kept well wrapped in the refrigerator. 

Tuesday, 5 January 2016

Baked Pears with Dark Chocolate and Almond Frangipane


Dessert...the perfectly ripe pears were the inspiration for this, as I knew that they would over ripen before we had a chance to eat them all. My first thought was pear crumble, then I saw the small piece of dark chocolate left from making the Dark,Milk and White Chocolate Truffles.

That's when I decided to halve the pears, and fill the hollow from the core with chocolate and frangipane. I checked my nut supply and I had exactly enough almonds to make the frangipane...a definite sign that it was meant to be!


Make the frangipane, by creaming together:

2 ounces softened butter
2 ounces of icing sugar


When the butter and icing sugar are light and fluffy, add:

1 egg
1/2 teaspoon vanilla
1/4 teaspoon almond extract


In a food processor, grind until fine:

2 ounces whole almonds
1/2 ounce flour

Add this to the creamed butter, sugar and eggs and mix until well combined.


Scrape into a bowl and set aside until needed.

Turn the oven on to heat to 350F, and grease an ovenproof dish.


In a small pot, heat to melt the butter:

2 ounces butter
1/4 cup maple syrup


Peel, halve and core 4 pears. I used Bartlett pears.

Place the pear halves into a bowl, add the melted butter and maple syrup and toss gently to coat the pears.


Arrange the pears in a single layer in the greased dish. If you need to, cut a small piece off the bottom of the pears to help them sit flat.

Reserve the melted butter and maple syrup.


Cut small chunks from a piece of dark chocolate and place them into each pear cavity.


Divide the frangipane between the 8 pear halves, and spread over the chocolate, mounding slightly.

Pour the reserved butter and maple syrup over the pears.


Bake until the pears are soft, the frangipane is golden and bubbling. It will overflow slightly, but this will get nice and crispy.

Allow the pears to cool for 5 minutes before serving.


I served one pear half per person, accompanied by softly whipped cream. The pears can be eaten hot or at room temperature.


  • Any type of pear will work, as long as it is ripe, but still firm. If it is too soft it will turn into pear sauce while baking; if it is too hard it won't soften enough. My rule of thumb is if I would eat it, it should be good to bake. I used Bartlett pears, as I prefer those for eating; Bosc or Anjou are good choices for baking or poaching.
  • To core the pears, cut them in half, and use a melon baller or small spoon to scoop out the core, creating a space for the chocolate. Use a paring knife to remove any of the stem that might remain.
  • If you don't have maple syrup, use honey or brown sugar. Coating the pears in the melted butter and maple syrup helps to prevent them from oxidizing.
  • Spices such as cinnamon, dried or fresh ginger, nutmeg or five spice can be added to the butter and syrup.
  • I had a choice of white, milk and dark chocolate...I chose dark as it is the most popular amongst the people eating the dessert. Any type of chocolate can be used with pears.
  • Frangipane can be made with any nuts. Those that work well with pears are almonds, hazelnuts, pistachios and pecans.
  • Orange or lemon zest can be added to the frangipane.
  • The frangipane can be used to fill other fruits for baking...apples, peaches or nectarines, plums, apricots. The choice of adding or omitting the chocolate is yours.
  • Turn this into a tart by using a pre-baked tart shell instead of the ovenproof dish. Make sure the pastry is not fully cooked, as it will finish baking along with the pears. Make a double recipe of the frangipane and spread a thin layer onto the pastry, and then scatter the chocolate chunks over it. Place the pears with the cut side down, and spread the remaining frangipane around them. Do not add the reserved maple syrup and butter...save it for another (drizzle it on pancakes!). Bake until the pears are tender and the frangipane is set and golden. You can drizzle melted chocolate over the pears as a garnish, or dust the cooled tart with icing sugar.
  • Use peanuts to make the frangipane, and sliced bananas instead of pears in your tart.
  • The frangipane can be made up to a week ahead and stored in a sealed container in the refrigerator. The pears can be coated and filled a few hours before baking. Wrap the dish well to prevent oxidizing (the melted butter and maple syrup will also help).

Monday, 4 January 2016

Warm Smokey Cheese Dip


Last night we had the last get together of the Christmas / New Year season, and I made this dip in an effort to use up some of the green onions and extra cheese that we had in the house. I also used some whiskey, as none of us are really whiskey drinkers.

 I served it with pita chips, made by cutting pita bread into eight pieces and tossing them with a bit of olive oil, salt and pepper...bake until crispy at a temperature of 325F.

The dip itself was incredibly rich, slightly spicy and is all gone! Yes, I would make it again, but not too often; this would be a tasty and much too easy way to pack on the pounds!


In a bowl, combine:

3/4 cup soft cream cheese
2 green onions, chopped
1 clove of garlic, minced
1/2 teaspoon smoked paprika
2 tablespoons whiskey
salt and pepper to taste


Stir in:

1 handful of finely grated Parmesan
2 large handfuls of grated aged Cheddar


Taste and adjust the salt, pepper and smoked paprika.


Scrape the dip into a small ovenproof dish.

Place into a 350F oven and bake until heated through and bubbling; this should take about 20 - 30 minutes.


Give the warm dip a good stir before serving it; the oils in the cheese separate slightly during baking.

Serve accompanied by crackers, bread or pita chips.


  • Warm dips are easy to put together ahead of time; put the dip in the oven to bake just before the guests arrive.
  • Soft cream cheese makes a good base. Either use spreadable cream cheese, or allow the brick of cream cheese to warm up and soften before using it.
  • Another cheese that is a good base for a warm dip is soft goat cheese.
  • Add any chopped fresh herbs that you have available, keeping in mind that the cheese can overpower milder tasting herbs. Good choices are chives, thyme, rosemary, basil.
  • Spices can add a lot to the cheese; I chose smoked paprika for the slight heat and smoky taste. Cayenne pepper, chipotle or ancho chilies can add heat and smokiness as well. Fennel seeds; pink, green or black peppercorns; nutmeg and cumin are also good choices.
  • The type of cheese you use is completely up to you...I also like to use goat cheese, blue cheese, asiago, pepper jack and smoked white cheddar.
  • Instead of green onions, fold in leftover caramelized onions; chopped sundried tomatoes; chopped cooked spinach; diced artichokes; roasted garlic or red pepper.
  • A fun presentation for a warm dip like this is to cut the top off a crusty round loaf, such as sourdough, and carefully remove as much of the soft inside as you can. Save this for breadcrumbs or croutons. Place the hollowed out loaf onto a baking sheet and into a 300F oven to toast and dry the inside of the bowl out slightly. Allow the bowl to cool before filling it. Place the cheese dip into the bowl and bake it right away (if you allow it to sit in the bread bowl too long before baking it will make the bread soggy). Serve.

Saturday, 2 January 2016

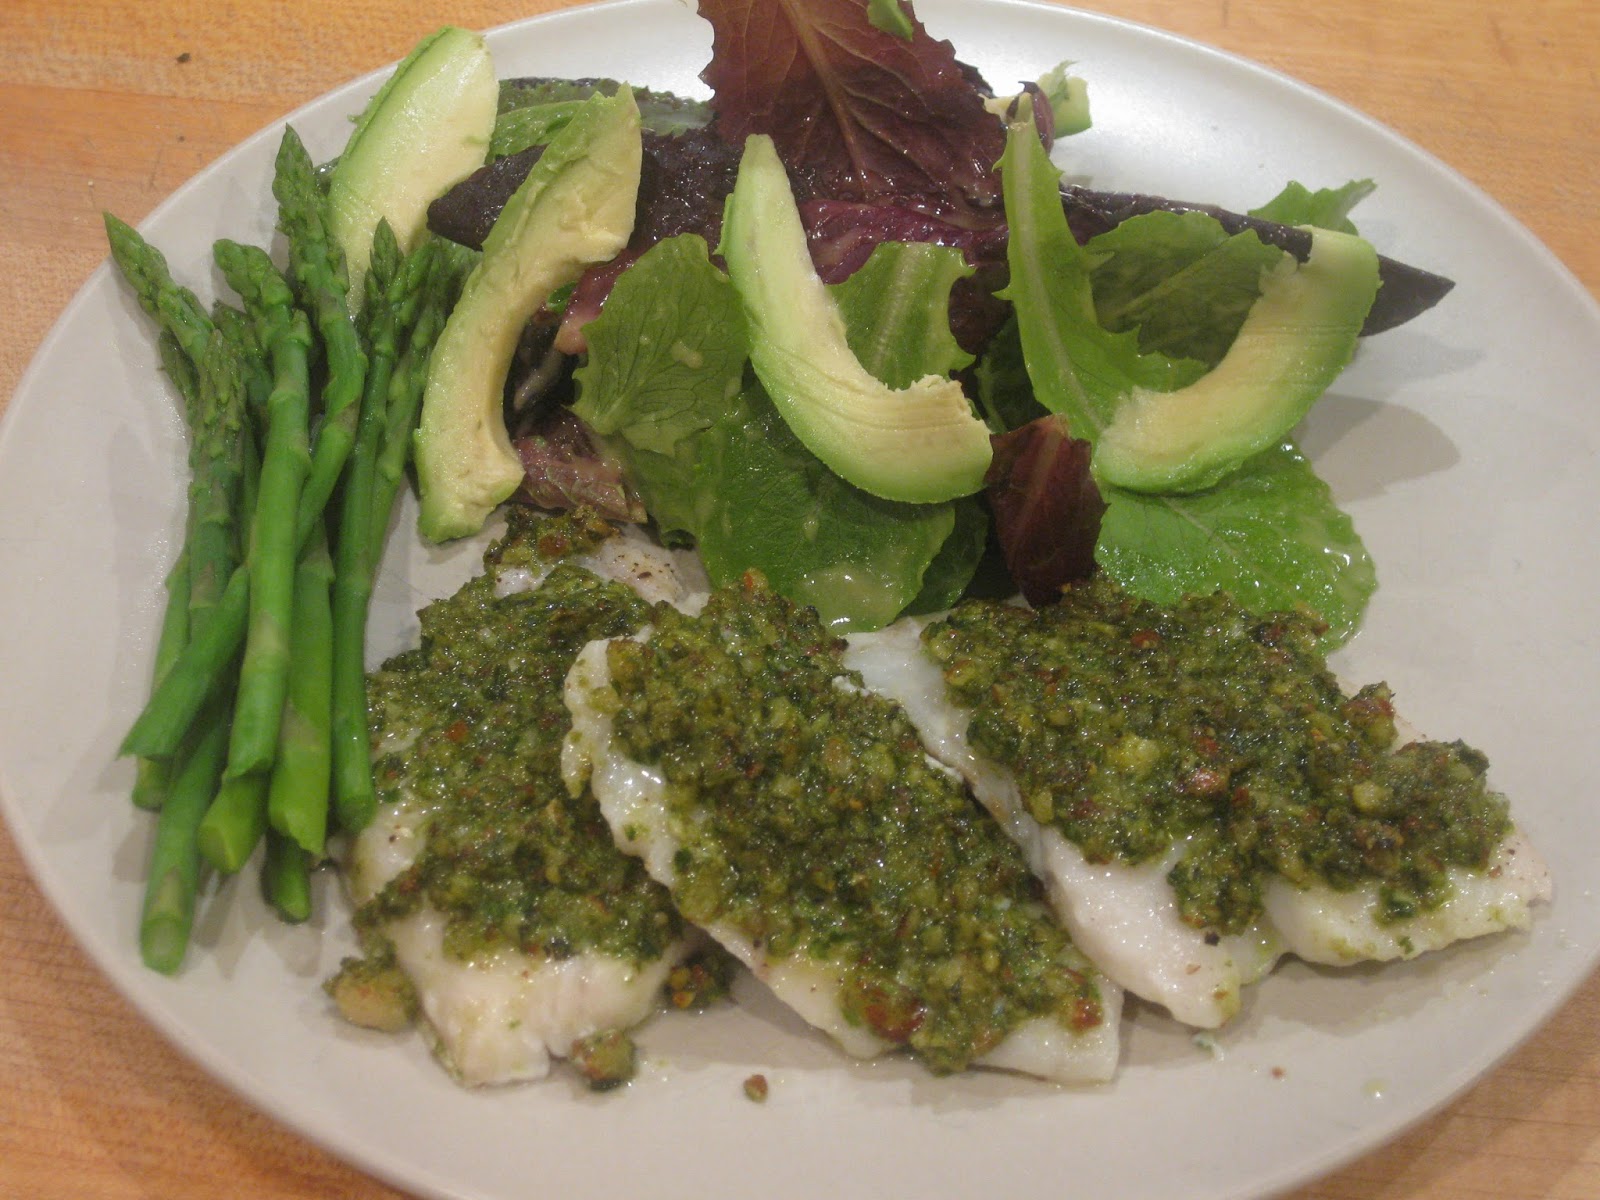
Basil, Spinach and Nut Crusted Haddock


I was given a bag of trail mix for Christmas, and had used the cashews in a tandoori chicken salad wrap. I decided to use the almonds, pecans and walnuts to crust some haddock. There was also some spinach and fresh basil in the fridge so I added these to the nuts to make a crust for the fish, which was then baked.

The nuts added crunch to the crust, which was a nice contrast to the moist, tender fish. I served the fish with a salad of baby romaine and avocado, using some leftover roasted garlic to  make  Roasted Garlic Vinaigrette, and added some fresh asparagus.

The meal was a success...my husband literally licked both of our plates clean!


To make the crust, combine the following in a food processor:

1 cup fresh basil leaves
1 cup fresh spinach leaves
1/2 cup mixed nuts (almonds, pecans and walnuts)
2 cloves of garlic

Process until finely chopped.


With the food processor running, slowly add:

1/4 cup olive oil

Continue to process, scraping the bowl down if needed, until you have a slightly chunky puree.


Remove the crust from the food processor. Stir in:

1 tablespoon fresh lemon juice

Taste and adjust seasoning with salt and pepper.


Pre-heat the oven to 375F. Lightly grease an ovenproof dish.


Pat the fish fillets dry, using paper towel. I was using frozen haddock.

Place the fish in a single layer in the prepared dish.

Divide the crust between the fish, gently spreading it to cover the fish.


Bake until the fish is cooked. The time depends on the thickness of your fish. You should allow between 8 - 10 minutes per inch of thickness.


Remove from the oven and serve.


  • This crust is a take on Basil Pesto. I used equal amounts of basil and spinach, and instead of pinenuts I used a mix of nuts from my trail mix. I also used more nuts and less olive oil, than I would use when making pesto.
  • The choice of herbs is entirely up to you and what you have available. Good choices for fish include parsley, dill, fresh thyme or rosemary. A mixture of herbs and spinach can also be used.
  • Instead of spinach, use arugula if you have some. This will add a nice peppery note to your crust.
  • Brighten the crust up by adding lemon zest, and/or capers.
  • Nut oils or avocado oil can be used instead of olive oil.
  • Any firm white fish such as cod, halibut, snapper or seabass can be used. Salmon can also be used. The crust can also be used on oysters or scallops on the half shell; serve them in the shell.
  • You can also use the crust on chicken breasts, lamb chops or pork chops.
  • Turn the crust into a sauce by increasing the amount of olive oil. Whipping cream can also be added to the crust to make a cream sauce.
  • The crust can be made ahead and frozen in ice cube trays, and then stored in a sealed container in the freezer until needed.