Wednesday 26 July 2017

Polenta Layered with Bocconcini, Artichokes, Basil and Tomato Sauce


A new twist on an old favourite...baked polenta. This was my way of using up 3 artichoke hearts, some sliced bocconcini and half a can of tomatoes...a very tasty way to do so, if I may say so! We finished the rest off for lunch today, and it was even better than it was last night. This is a good sign, as it means making it ahead works, which can be a great time saver.

I used the canned tomatoes to make a quick tomato sauce, with onion, garlic, tomato paste and oregano. I also added a bit of sugar to counteract the acidity. 

The bocconcini on the top melted and crisped up, the cheese inside stayed nice and gooey. I kept the polenta layers thin, so the overall effect wasn't too heavy.

Start off by making a batch of polenta as shown in the post Polenta Baked with Italian Sausage and Tomatoes. 

Line a 10" square pan with plastic wrap and spread the polenta evenly in the pan. Wrap and allow to cool in the fridge for a few hours, or overnight.


Tip the cooled polenta out of the pan, unwrap it and cut it into 3 equal pieces.


Line a loaf pan with foil, and lightly grease the foil.

Place one of the pieces of polenta into the pan.


Place on top of the polenta:

2 bocconcini slices, torn into smaller pieces
1 1/2 artichoke hearts, roughly chopped
1 tablespoon chopped fresh basil
Ground black pepper


Cover this with:

1/3 cup tomato sauce


Repeat these layers with the second piece of polenta, and then finish off by placing the last piece of polenta on top.


Cover the polenta with:

1/3 cup tomato sauce
4 slices of bocconcini

If you have tomato sauce left over, spoon it down the sides of the pan. I had about 1/2 cup left over to use in this way.


Place into a pre-heated 350F oven, and bake until it is hot in the middle, the sauce is bubbling and the cheese on top is golden.

This should take between 30 - 45 minutes.

Remove from the oven and leave to set for 5 minutes, before serving.


I used each piece of cheese on top as a portion guide, so we each had a piece for dinner, and another for lunch today! Cut it into smaller pieces if that is what you would prefer.


  • You can make a larger amount of polenta and layer this in a square pan if you choose; I made 2/3 of the recipe and used an 8" pan to spread the polenta and an 8" X 5" loaf pan. Try and keep the polenta no more than 3/4" thick if you can.
  • Lining the loaf pan with foil makes serving easy...simply lift the foil out of the pan, gently push the sides down and slice.
  • As I mentioned at the beginning of the post, this can be assembled a day ahead.
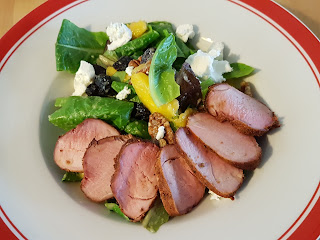
  • I served this with pork, but it can be the main meal, especially if you add more vegetables or meat to the layers.
  • Vegetables that can be added include: spinach; grilled peppers, zucchini, mushroom, eggplant; cooked leeks; olives; asparagus.
  • Meat that can be added: any leftover cooked meat, diced or thinly sliced; cooked and crumbled sausage; ham, prosciutto or bacon.
  • Use a purchased tomato sauce to save time, or Basic Tomato Sauce if you have some in the freezer.
  • Pesto or tapenade can be used instead of fresh basil.
  • Grated mozzarella, feta cheese or soft goat cheese can also be used.

Saturday 22 July 2017

Thai Red Curry Crusted Halibut with a Lime Coconut Broth


This dish turned out exactly as I had pictured it...and was a perfect light, slightly spicy and very satisfying meal. The best thing about it was that the fish was the only thing that wasn't "almost wasted". I bought it to serve with the things I needed to use...a cut lime, half a red and half a yellow pepper, some leftover cooked rice, a green onion and half a white onion, coconut milk and chicken stock.

I combined the Thai red curry paste with some breadcrumbs and this made a lovely crunchy, spicy crust for the flaky, moist halibut. I served the fish on top of the rice, and poured the broth around it, in effect creating a sauce / soup that was seasoned even more by the crust on the fish.


To make the broth, start by cooking over a low heat in a bit of olive oil:

1/2 red pepper, thinly sliced
1/2 yellow pepper, thinly sliced
1/2 onion, thinly sliced


When the onions are starting to become translucent, add:

1 lime, cut into slices
1 slices of fresh ginger, about 1/8" thick
3 cloves garlic, roughly sliced
3 dried curry leaves

Cook, stirring for a couple of minutes.


Stir in:

1 cup coconut milk
1 cup chicken stock

Bring to a boil, then turn the heat down and simmer for 15 - 20 minutes. Taste and adjust seasoning; I added some salt and pepper.


While the broth is simmering, make the crust for the halibut by rubbing together with your fingertips:

1/4 cup breadcrumbs
drizzle of olive oil
1 heaped teaspoon Thai red curry paste


Turn the oven on to heat to 400F.

Place the halibut into an ovenproof dish, and gently press the crust onto the top of the fish.


Bake until the fish is cooked and the crust is crispy; about 12 - 15 minutes.


Before serving, remove the slices of ginger, the curry leaves, and if you choose to, the lime slices from the broth. Make sure the broth is piping hot. Stir in 2 tablespoons of chopped fresh basil.


Place a heaped spoonful of rice into the centre of each serving bowl, mounding it up to leave a space around it for the broth.

Carefully divide the broth between the bowls, pouring it around the rice. The broth will heat the rice.


Gently place a piece of fish on top of the rice.

Sprinkle green onion over the broth.


I garnished the bowls with a couple of nice long fresh chives. Serve with a spoon and a fork, as both will be needed.


  • Despite the fact that I had finished the soy sauce, and had no fish sauce, the broth was very tasty, and only needed a small amount of salt at the end. I went easy on the pepper because of the red curry paste.
  • If you have soy sauce or fish sauce, either one would be a good addition to the broth, and will take care of the salty part of the seasoning. Do not add a lot; taste and add more as needed.
  • Yes, I used chicken stock, but in combination with all the other flavours it was not noticeable. Of course, vegetable or fish stock, or all coconut milk can be used.
  • The broth can be made a day ahead, and re-heated when you are ready to serve the fish.
  • The rice I had was basmati; any leftover rice can be used.  By adding the piping hot broth and then topping it with the hot fish, the rice heats through very quickly.
  • Noodles can be used instead of rice if you want.
  • The Thai red curry paste adds moisture and flavour to the breadcrumbs; feel free to add more if you want more heat. As you eat the fish, little bits of the crust break off into the broth and add another layer of flavour to it.
  • I used halibut; you can use any firm white fish, including jumbo scallops. The crust could also be used on chicken breast.
  • My husband is not a fan of cilantro, but I am, and I know that some finely chopped cilantro would really add to the freshness of the broth. If you do add it, do so only at the end, with / instead of the basil, to maintain the bright, fresh flavour.

Friday 14 July 2017

Barbecued Korean Ribs


We were given some Korean ribs by houseguests, and I was excited to try something new. Korean ribs are cut across the bone, so that each strip of meat is about 1/4" thick, so they cook really quickly on the barbecue. Of course, marinading for flavour and tenderness is a must, so I went through the fridge, and here is what I came up with...

The same houseguest had brought some orange puree (she basically just pureed the oranges in her fridge), so I used some of this, and used up my ginger, sesame seeds, green onions, half a lime and the soy sauce.

The meat was full of flavour (I felt a bit more soy sauce was called for, so I have adjusted that in the recipe for you), tender with crispy edges. The ribs are quite rich, because of the fat, but it does crisp up on the barbecue, so if you're ok with it, you get that bonus! Half of us were happy about this, the rest of us were glad to share!


To make the marinade, combine:

Juice of half a lime
3 - 4 tablespoons soy sauce
1 teaspoon sriracha
2 tablespoons brown sugar
2 green onions, minced
2 cloves garlic, minced
1 teaspoon fresh ginger, minced
1 tablespoon vegetable oil
3/4 cup orange puree


Give the ribs a quick rinse under cold water, and pat dry with paper towel.

I used:

2 pounds Korean style ribs


Place the ribs and marinade into a resealable plastic bag, and close, pressing out as much air as possible. Place into the refrigerator for 4 - 6 hours, or overnight if possible.


Remove the ribs from the marinade, and cook on a hot barbecue, turning once or twice, until cooked through (no longer pink around the bone).

This should take about 10 - 15 minutes.


Serve the ribs, garnished with minced chives or green onions, and toasted sesame seeds. Make sure there are plenty of napkins available at the table.

I served coconut rice, steamed snap peas and an Asian Slaw ( from the post Mango and Tamarind Glazed Pork Tenderloin with Asian Slaw).


  • The marinade can be used with other ribs...baby back, short ribs, country style ribs...just keep in mind that these require much longer cooking, and are best cooked in the oven on a low temperature for a few hours, before being finished off on the grill.
  • Not everyone has orange puree, or oranges to puree, so some other options are pureed ripe mango; frozen juice concentrate that has been defrosted (orange or mango), tamarind puree, hoisin sauce.
  • If you use tamarind, you will need to add a bit more sugar; if you use hoisin you will need less or no sugar. Taste and adjust the seasoning of the marinade before adding it to the meat.
  • Sesame oil instead of vegetable oil would be a good idea, adding a nice depth of flavour. I have no sesame oil at the moment, so I made do.
  • This recipe fed four adults.

Tuesday 11 July 2017

Apple Vinaigrette...and Two Salads


Baby Romaine with Apple Vinaigrette, Mango, Toasted Pecans and Goat Cheese


Mixed Greens with Apple Vinaigrette, Blackberries, Avocado, Smoked Scallops and a Parmesan Crisp


This post is all about apples....I had two that had lost their crunch, so were not being eaten. My first thought was to bake with them, but I think that this was a better, and somewhat healthier choice.

I poached them, with a sprig of fresh rosemary and some apple juice, and used them to make a vinaigrette. We have had two lovely fresh salads, and have enough left for one more. Guess what's for dinner tomorrow night???

If you want to know more about the Parmesan Crisps in the second salad, have a look on my Instagram @almost_wasted.blogger.


To start the vinaigrette, place the following into a small saucepan:

2 small apples, peeled, cored and chopped
1 sprig of fresh rosemary
1 cup of apple juice


Bring to a boil, then turn the heat down and simmer until the apples are tender. Remove from the heat and allow to cool. Discard the rosemary.


Place the cooked apples and their juice into a jug or bowl, along with:

1 teaspoon Dijon mustard
2 tablespoons apple cider vinegar

Using a hand blender, puree until smooth.


Add:

4 tablespoons olive oil

Blend until you have a thick, emulsified vinaigrette.

Taste and adjust seasoning. Keep refrigerated until needed.


When it is time to assemble and serve your salad, gently toss the greens with the Apple Vinaigrette. Place the greens onto the plates, adding any other garnishes, fruits, cheese, nuts or proteins that will form the rest of the salad. Serve, and enjoy!


  • The sweetness of the apples and apple juice are nicely offset by the apple cider vinegar, with the mustard providing a hint of heat in the background.
  • The vinaigrette will keep, in an airtight container, in the refrigerator, for about 5 days.
  • No apples? Use pears, peaches, plums or mango.
  • Add spices instead of rosemary....try a star anise, a cinnamon stick, a piece of fresh ginger.
  • The fruity sweetness of the vinaigrette is not overpowering; there is a definite tang from the vinegar. This type of dressing is perfect for summery salads that contain fruits, lighter cheeses and nuts.

Monday 10 July 2017

Dried Cherry and Pecan Scones


What to have for breakfast after our walk this morning? That was the question. These yummy scones were the answer. I used up the last of the dried cherries (which means another visit to the Farmers' Market to buy some more!) and finished off the pecan pieces.

I usually use all milk for my scones, but used some Greek yoghurt as well, and it added a bit of richness, which was nice. Raspberry jam, a cup of hot coffee...what a great start to the week!

Start by turning the oven on to heat up to 375F, and line a baking sheet with parchment paper.


Measure the dry ingredients:

2 cups flour
2 tablespoons brown sugar
4 teaspoons baking powder


Add the butter and rub it into the dry ingredients with your fingertips until you have a crumbly texture:

4 tablespoons softened butter


Stir in:

1/4 cup roughly chopped dried cherries
2 tablespoons pecan pieces


In a separate bowl, whisk together the wet ingredients:

2 tablespoons Greek yoghurt
Milk to bring the amount to 2/3 cup total
1 egg
1 teaspoon vanilla


Make a well in the centre of the dry ingredients and add half of the liquid.


Gently mix the dry ingredients into the wet ingredients, adding the rest of the liquid in as you mix, until a rough dough forms.

Turn the dough onto a very lightly floured board and knead very gently two or three times, just enough to bring the dough together.


Using your fingertips, press the dough out into an 8" - 9" circle, and cut into 8 wedges.


Place the dough wedges onto the prepared baking sheet and brush the tops with a bit of milk.


Bake until the tops of the scones are golden, about 15 - 18 minutes.

Remove from the oven and allow to cool for 5 minutes before serving.


I served mine with soft butter, melting into the hot scone, and raspberry jam for those who wanted a little bit of extra sweetness and flavour.


  • Use any dried fruit you have on hand; chopped apricots, raisins, cranberries, mango even candied ginger would work well.
  • Nuts, of course, are interchangeable, or can be omitted.
  • If you use fresh or frozen fruit, remember that they will add extra liquid to the scone, so keep the dough a bit drier than you think it should be, adding only about 1/2 cup of  milk, and then judging from there.
  • Add spices such as cinnamon, nutmeg, ground aniseed, ginger.
  • Sweeten it up by adding finely chopped or grated chocolate.
  • Use a cookie cutter to make round scones, split them in half when cool and turn into berry shortcakes by topping with a berry compote (warm or cold) and whipped cream.

Saturday 8 July 2017

Grilled Red Pepper and Grape Tomato Salad with Feta and Basil


This salad was not about using something up, that was the rest of the meal, but it was so fresh and easy, I had to share it. As far as using food items up, I added some mayonnaise to the leftover boiled new potatoes tossed in Basil Pesto from a couple of nights earlier, to make a very nice potato salad. This is one I will make again....on purpose this time!

The chicken thighs were marinated in a roasted red pepper vinaigrette that neither one of us loves...this added quite a bit of flavour, and allowed me to use it for something other than salad.

As I had some beautiful sweet red peppers and grape tomatoes, tons of fresh basil in the garden and a block of feta cheese I came up with this salad as an accompaniment.


Cut two sweet red peppers into large pieces, removing the seeds and white pith from inside.

Toss in a drizzle of olive oil, and season with salt and pepper.

Grill, turning once, until slightly charred on both sides. Remove from the heat and allow to cool.


Place the grape tomatoes onto skewers, as this makes them easier to control, and less likely to fall through the grill.

Lightly oil and season, and grill, turning as needed, until all sides are slightly charred and starting to split or wrinkle.

Remove from the heat and allow to cool.


When cool enough to handle, gently pull the tomatoes off the skewers and place in a bowl.

Thinly slice the peppers, and add to the tomatoes, along with:

1/4 cup chopped fresh basil


Add:

3/4 cup cubed or crumbled feta cheese
salt and pepper to taste


Add:

Balsamic vinegar to taste and a drizzle of olive oil if you feel it is needed.

Mix gently, taste and adjust seasoning.


As I mentioned, I served this with grilled chicken thighs and a pesto potato salad. The freshness of this salad was a nice contrast to the rich mayonnaise and pesto on the potatoes. Very summery and light, perfect for barbecue and picnic season!


  • The red peppers and tomatoes do not have to be grilled, they can be cut and used fresh. I like the smoky flavour of roasted / grilled peppers, that was the reason I did them this way.
  • If you have peppers of different colours, or tomatoes of different colours, your salad will brighten the table up even more.
  • Another cheese that will work nicely is soft goat cheese, as it also has a tangy flavour to it. It would also add a creaminess to the salad.
  • If you do not have fresh basil, but have Basil Pesto  in the freezer, defrost some and use it as your dressing. You will still get the fresh basil taste, but also the added zing of garlic.

Tuesday 4 July 2017

Prosciutto Wrapped Chicken Breast Layered with Basil, Sundried Tomato and Goat Cheese


I bought 4 slices of prosciutto last time I was at the store, and had yet to use it. I know I had a reason for buying it, but for the life of me can't remember what that might have been. The thought of wrapping it around the chicken breasts I had for dinner appealed to me...I took it a bit further and layered the chicken breasts with diced sundried tomatoes, some soft goat cheese and some of the basil in the herb garden that is in dire need of being used (I did make and freeze some Basil Pesto as well).

Instead of making a cavity in the chicken breasts, I sliced them in half horizontally, creating two thin layers, which I sandwhiched together with the filling, and then wrapped in the prosciutto.

The chicken was moist and juicy, the filling was creamy and tangy, and the prosciutto was crispy and salty. Such a wonderful combination of flavours and textures.


Make the filling by combining:

2 tablespoons chopped fresh basil
3 tablespoons minced sundried tomatoes
1 clove garlic, minced
2 teaspoons chopped fresh chives
1/4 teaspoon freshly ground black pepper
pinch of salt


Carefully slice the chicken breasts in half horizontally, giving you 2 thin pieces per person. Place one piece from each breast onto a plate, and lightly season with ground black pepper.


Divide the filling between the seasoned chicken
breast slices, spreading it evenly across the meat.


Crumble soft goat cheese over the top of the filling. I used:

1 -  2 tablespoons per piece


Place the second slice of chicken breast on top of the filling, creating a sandwhich our of the original chicken breast and the filling.

Season lightly with black pepper.


Lay 2 pieces of prosciutto per chicken breast side by side on a cutting board, as shown.

Place a stuffed chicken breast onto each one, and roll up to create a package, as shown in the picture.

Chill until you are ready to cook.


Cook in a hot pan, with some olive oil to prevent sticking.

Keep the heat medium high, and cook on the first side until the prosciutto is golden and crisp, then carefully turn over and cook on the second side until the prosciutto is golden and crisp.

Cook until the chicken is fully cooked, turning a few more times during the cooking.


Remove from the heat and allow the chicken to rest for 5 minutes before cutting in half to show the filling, and serving.


I served the chicken with grilled asparagus, red peppers and zucchini, and boiled new potatoes that were tossed in some  Basil Pesto. We opened a bottle of Chardonnay from one of the local wineries here in the Okanagan, and it was a perfect complement to the food. All in all, a really good end to a busy day.


  • If you would prefer to stuff the chicken by creating a pocket in the breast, mix the goat cheese with the sundried tomatoes and basil and then stuff it all into the cavity at once.
  • There is no need to use toothpicks to hold the chicken together...the prosciutto does that nicely.
  • I left the fat on the prosciutto, and as it melted during cooking, it kept the meat moist, and also added flavour.
  • Bacon can be used instead of prosciutto; this will give a slightly smoky flavour.
  • I added only a small pinch of salt to the filling as I knew that the sundried tomatoes and prosciutto were salty, and people could add more at the table if they chose. It wasn't necessary at all.
  • Other cheese that could be used include feta (again, watch the salt, consider rinsing the brine off first), cream cheese, brie.
  • I used basil as I have an abundance of it right now, but you can use any herb that you have or like.
  • My original plan was to sear the prosciutto wrapped chicken in a pan and then place it into the oven to finish cooking. It was a very hot evening though, and the thought of having the oven on was not very appealing, so I used an ovenproof pan to cook the chicken on the barbecue while I grilled the vegetables. It worked really well, and is worth trying. When the grill is closed, it acts just like an oven.
  • The chicken can be filled and wrapped ahead of time, make sure to keep it well wrapped and refrigerated until you cook it.
  • Boneless skinless chicken thighs can be used instead of chicken breast. Try using pork or beef tenderloin as well.