Sunday, 16 August 2015

Chicken, Asparagus and Boursin Cheese Stuffed Crepes


A few days ago I roasted a couple of chickens, with the intention of freezing the cooked meat in small portions for sandwhiches and wraps. This is what I usually do, but for some reason I forgot to freeze the chicken right away. I knew I had to use it up; combining it with the last of the fresh asparagus and some herb Boursin cheese, stuffing it into crepes and then baking everything smothered in a rich, creamy cheese sauce was my plan.

This also allowed me to use up the small piece of Swiss cheese that was in the fridge, as well as some open chicken stock. For the person who doesn't like asparagus, I made some crepes filled with chicken, artichoke hearts and Boursin cheese. This was a win win, as those of us who like both asparagus and artichokes had the choice of both!

This was a project that stretched out over the whole day, but as I had no big plans and it was raining outside, this was OK with me. To avoid spending all day making dinner, the filling and crepes can be made ahead over a couple of days, and then the whole dish just needs to be assembled, baked and enjoyed!


For the filling, cook until soft and slightly coloured:

1/3 medium zucchini, diced
1 large shallot, diced
1/2 medium onion diced

Use a bit of olive oil to cook them, and season with salt and pepper.


When the vegetables are soft, add:

Enough flour to coat the vegetables well when stirred; I used about 1 - 2 tablespoons.

Cook, stirring, for 2 - 3 minutes.


Add chicken stock, a little at a time, stirring constantly. You are looking for a smooth sauce, with chunks of vegetables, that is the consistency of a thick gravy.

Taste and adjust seasoning. Remove the sauce from the heat.


In a bowl combine:

2 cups diced cooked chicken
12 asparagus spears, cut into 1" pieces and quickly blanched and cooled.


Now add half of the sauce to the bowl and mix well to combine.

The other half of the sauce will be added to the artichoke filling.


Crumble half a package of garlic and herb Boursin cheese into the bowl, mix well to combine, taste and adjust seasoning. Set aside until needed.

The other half of the Boursin cheese will be added to the artichoke filling.


To make the crepes, combine the dry ingredients in a large bowl:

2 cups flour
1/4 teaspoon salt


Whisk together the wet ingredients:

2 cups milk
4 eggs


Add the wet ingredients to the dry and whisk until well combined, and no lumps remain.

Set the batter aside to rest for 30 minutes.


While the batter is resting, get a flat non stick pan ready, along with a spatula for flipping the crepes. I used a 2 ounce ladle to measure the batter into the pan. Have a baking sheet ready beside the stove for the cooked crepes to cool on.


Stir in:

1 tablespoon chopped fresh herbs
2 tablespoons vegetable oil

Add more milk if the batter is too thick. It needs to be thin enough to pour into the pan and swirl around to coat the surface thinly.


Heat the non stick pan over a medium high heat until it is very hot.

Remove the pan from the heat, and holding it over the crepe batter, pour a ladle of batter into the pan, swirling and tilting the pan so that the batter covers the surface as evenly and thinly as possible.

Place the pan back on the heat and allow the first side of the crepe to cook.


When the surface of the crepe better is no longer wet, and the sides can be easily lifted, carefully slide the spatula under the crepe and flip it over.

The second side only needs a few seconds in the pan.


Slide the cooked crepe out onto the waiting baking sheet, overlapping the crepes slightly.

This recipe made 17 crepes.


Lightly grease a 9" X 13" ovenproof dish. Lay 8 crepes out onto the clean counter, with the side that was cooked second facing up.


 Divide the filling evenly between the 8 crepes.


Fold the side closest to you over the filling.

Fold the two sides over towards the centre.

Roll the crepe and filling away from you, forming a package.


Place the crepe packages into the prepared dish.


Make a Basic White Sauce (Bechamel)  , using 3 cups of milk.

Whisk in:

a handful of grated Parmesan
a handful of grated Swiss cheese.

Taste and adjust seasoning.


Pour the cheese sauce over the top of the crepe packages and sprinkle any remaining cheese over the top.


Bake at 350F until heated through and the sauce is bubbling, with a crispy golden top. Allow the crepes to rest for 5 minutes before serving. This will allow the sauce to set a bit, making it easier to serve.


  • To make the chicken, artichoke and Boursin filling, follow the same steps as for the asparagus filling, but use 6 artichoke hearts, diced, instead of the blanched asparagus spears.
  • The whole dish can be made and assembled a day ahead...simply bake and serve. Alternatively, the crepes and filling can be made a day or two ahead, leaving the sauce, assembly and baking for the day of serving.
  • This is a very rich dish, so a little will go a long way.
  • Milk or whipping cream can be used if you have no chicken stock when making the filling.
  • I used part onion and part shallot as I had one shallot that had been overlooked and needed to be used. Leeks or green onions can be used as well.
  • The filling is very versatile. Vegetables can be used according to what you have, what you like and/or what is available that season. Remember if you are using greens such as spinach, kale or chard to wilt them and squeeze out as much excess liquid as you can so that the filling does not become watery during baking.
  • Other vegetables to try include: sliced and cooked mushrooms; red pepper, fresh or roasted; grilled eggplant or zucchini; frozen corn or sweet green peas; edamame beans; roasted garlic or sundried tomatoes.
  • Meats choices are not limited to chicken. Use any leftover cooked meat, diced or shredded. Pork tenderloin or leftover roast; pulled pork, beef or chicken; smoked chicken; diced ham; cooked shrimp and/or scallops; flaked cooked fish; smoked salmon chunks; ground beef, chicken, turkey pork or lamb; cooked, sliced sausage such as chorizo.
  • Meat can be eliminated and the crepes can be vegetarian if you like. Ricotta or cottage cheese can be added to the filling, as well as extra vegetables and/or beans.
  • Cheese is your choice. I used the Boursin because we all love it and I had bought some as a treat. Cream cheese, especially flavoured types can be used instead. Grated cheese such as cheddar, Asiago or havarti can be used; baby bocconcini, crumbled goat or blue cheese or sliced Brie can also be used.
  • If you don't want to attempt the crepes, or don't have the time, some grocery and specialty food stores sell them ready made, often in the freezer section. If you are making them, make extra, layer them with parchment paper in between, and freeze them for another meal.
  • The herbs I used were chives and thyme, as I have a lot of these in the garden right now. Any herbs will work; choose the type you use according to the meat, cheese and vegetables in your filling. Spices such as ground black pepper, cumin, paprika or chili flakes can also be used. The  crepes can also be made plain, without any flavouring other than the salt.
  • Plain crepes, or those flavoured with sweeter spices such as cinnamon, vanilla or lemon zest are perfect to use for dessert. Use a sweet filling...apple pie filling, chocolate spread or nut butter, fresh fruit and whipped cream or simply sprinkle them with cinnamon sugar and squeeze some lemon juice over the crepe. If you are making dessert crepes that will be baked, consider adding cream cheese or mascarpone cheese to the filling...it will melt and add a lot of richness and creaminess.
  • The cheese sauce is a Basic White Sauce (Bechamel). Adding the Swiss cheese and Parmesan turns it into a Mornay sauce. The two cheeses are sharp in flavour, and the Swiss adds a gooey element to the sauce. I added extra milk to the sauce as I wanted it to be thinner; it is easier to pour over the crepes, and it also thickens a bit in the oven.
  • Other sauces can be used if you prefer...Basic Tomato Sauce, Basil Pesto or even a combination of sauces.


Wednesday, 12 August 2015

Chicken Thighs in Mole Sauce


I had 6 chicken thighs defrosted and no idea what to do with them, when I remembered the cocoa nibs that I had brought back from Hawaii. Chicken in mole sauce it was...slightly sweet, spicy and rich with a hint of chocolate in the background, served with warm tortillas, this is a beautiful, complex dish, but well worth the time it takes to make it.

Besides the cocoa nibs, I also got the chance to use the last few raisins and some Basic Tomato Sauce that was in the fridge.

This is my version of the sauce, by no means the classic mole sauce, but it makes allowances for time and for substitutions for traditional ingredients that I didn't have when I chose to make it.


Start by grinding nuts and spices to a fine powder:

2 tablespoons whole almonds
1 teaspoon cumin seeds
1 teaspoon aniseed
1/2 teaspoon whole cloves
1/2 cinnamon stick


Place the ground nuts and spices into a pan and dry toast them until they start to release their aromas, stirring constantly to prevent burning.

Remove from the heat and set aside.


Using the same spice grinder, grind:

2 tablespoons cocoa nibs, until you have a fine powder. Set aside until needed.


On a plate, combine:

1/2 teaspoon ground cinnamon
1/4 teaspoon dried, ground chipotle chili
1 tablespoon lime juice
1 tablespoon olive oil
1/4 teaspoon salt
1/4 teaspoon ground black pepper


Cut the chicken thighs in half. I used:

6 boneless, skinless thighs

Rub the spices, oil and lime juice onto the chicken, making sure all surfaces are well coated.


In a hot, dry pan, brown the chicken on both sides. The olive oil in the rub is enough to prevent sticking.

Remove from the pan and set aside.


In the same pan, with a bit of olive oil, cook:

1/2 onion, diced
2 cloves garlic, minced

Cook until the onion starts to soften, stirring occasionally.


When the onions are soft, add the ground almonds and spices to the pan, and cook for a couple of minutes, stirring.


Add:

1 cup chicken stock
1 cup Basic Tomato Sauce

Bring to a boil.


When the sauce starts to boil, add the chicken thighs back to the pan, so that they can finish cooking in the sauce.


Add:

1 X 14 ounce can diced tomatoes, drained
1/3 cup dark raisins.

Allow the sauce to simmer with the chicken for about 30 minutes.


At this point, stir in the ground cocoa nibs, and leave the sauce to simmer for another 30 minutes, or until you can easily pull the chicken into smaller pieces using two forks.


Taste and adjust seasoning. Serve with warm tortillas, or over rice. Garnish with toasted flaked almonds and avocado.


  • When I have made mole before I have used pumpkin seeds, but only had almonds to use this time. You can use pumpkin seeds, or a combination of the two.
  • Canned chipotle chilies in adobo sauce can be used in the sauce, with or without the dried chipotle chilies in the rub. Adjust both according to the spice level you are comfortable with...using more or less, both or only one.
  • Other fresh chilies such as ancho or pasilla can be roasted, peeled and seeded and pureed in a blender along with the chicken stock before it is added to the sauce. Again, watch the heat levels. The best thing to do is to make a paste with the roasted peppers and some of the chicken stock, and add a bit at a time, until you are happy with the heat levels. Using a variety of hot peppers adds depth to the dish.
  • If you are working with fresh chilies remember to always wear gloves, never to touch your face as the oils burn intensely. Use good ventilation when roasting them, as the fumes can irritate your eyes. 
  • Ground cinnamon can be used to replace the cinnamon stick. A ratio of 1 teaspoon ground cinnamon to 1 cinnamon stick is a good guideline to work with.
  • I used my cocoa nibs as I had them and wanted to try them in another dish (see the post Cocoa Nib Spiced Chicken Breast with Coconut Rice and Mango). They give the rich chocolate flavour and aroma, without adding any of the sweetness. Dark chocolate can be used instead, but use chocolate with a high cocoa content, 72% or higher. If you can buy unsweetened chocolate that is even better. Finely chop the chocolate before stirring it in. 
  • Fresh tomatoes or tomatillos can be used, instead of, or as well as the canned tomatoes. Peel, seed and chop the tomatoes before adding them. Remove the papery skin from the outside of the tomatillos and chop them before adding them to the sauce. They add a fresh, tart note to the sauce.
  • I added the raisins in whole, and allowed them to soften and break down during cooking. They can be pureed with the chicken stock before being added, but I like the burst of sweetness and texture they add when you leave them whole.
  • The chicken can be left to marinate overnight, or for a few hours, with the lime juice, olive oil and spices. This will intensify the flavours.
  • Use turkey or pork instead of chicken for something different.
  • The sauce can be made 2 - 3 days ahead. It can also be frozen. Simply rub the chicken, sear it and add it to the sauce, simmering until the chicken is tender. You can also stir in leftover cooked chicken. The whole dish can also be frozen.
  • Leftovers can be shredded and used to make tacos, wraps or pizza.

Thursday, 6 August 2015

Grilled Corn Succotash with Cumin Rubbed Chicken


There was corn on the cob to be used, beautiful, fresh, sweet and juicy. There was also a tiny amount of edamame beans and white kidney beans in the freezer, neither one enough to be used alone. Combining the three to make succotash seemed like a reasonable solution to me.

I grilled the corn before removing it and making the succotash; I chose to grill the last of the yellow and green zucchini and then bake it with a bit of grated Parmesan instead of adding it to the corn and beans. To round off the meal I made some cumin rubbed grilled chicken breasts. This was a delicious and surprisingly filling meal.

Start off by preparing the zucchini...


Thinly slice:

1/2 yellow zucchini
1/2 green zucchini

Toss with olive oil, salt and pepper.


Place on the hot grill and cook just long enough to get some lovely grill marks on each side.

It will be cooked again, so be careful not to overcook it at this point.

Remove from the grill and allow it to cool enough to handle.


Lightly grease a dish that can be placed in the oven or on a hot grill.

Arrange the zucchini, slightly overlapping the slices.

Season lightly with salt and pepper. Sprinkle chopped fresh thyme over the top, and lastly, sprinkle grated Parmesan over everything.


Set aside until the chicken is on the grill. Then place the zucchini on the top shelf of the BBQ to reheat it, and to finish cooking it. The Parmesan will melt and go a bit crispy. Allow it to rest for 5 minutes before serving it, as the juices get very hot!


To make the succotash, start by shucking the ears of corn and lightly rubbing them with a bit of olive oil.


Place the corn onto the hot grill while you are grill marking the zucchini slices, turning it every few minutes so that it cooks evenly.


When the corn is done, it will have a bit of colour from the grill, and a smoky flavour.

Remove it and allow it to cool.


Using a sharp knife, cut the kernels off the corn cobs, and place in a bowl with:

1/4 cup edamame beans
2 tablespoons white kidney beans
1 cup halved grape tomatoes
3 chopped green onions
1 tablespoon chopped fresh chives
salt and pepper to taste
olive oil and lime juice to taste


Allow the succotash to come to room temperature before serving it; the flavours are brighter this way.


For the chicken breasts, rub them with:

Olive oil
Ground cumin
Salt and pepper


Cook on the hot grill, turning occasionally until the chicken is cooked through.

Remove from the heat and allow the meat to rest for 5 minutes before slicing, and serving.


This seems like it was a lot of work, but once the zucchini is grilled and assembled, everything happens while the chicken cooks, and the zucchini reheats. A lovely light summery meal...


  • The zucchini slices and corn can be grilled a day ahead...throw them onto the BBQ when you are making dinner, and you are ahead of the game the next night!
  • The zucchini can also be assembled the day before; keep it well wrapped in the refrigerator.
  • If you want to heat the zucchini in the oven, do so at 350F until it is heated through, tender and the cheese is crisping up.
  • Other cheese that would be good choices with zucchini are feta cheese or goat cheese.
  • The grilled zucchini can be added to the succotash...it is part of the dish, but I chose to separate it for those in the family who don't like zucchini.
  • Frozen corn can be used instead of fresh, but when the short corn season is upon us I like to use fresh as much as I can.
  • Use your favourite beans, or those that you have available. I try to think about presentation and colour when I make dishes like this. The edamame beans added a lot of colour; black beans would add a beautiful contrast to the corn and tomatoes.
  • Heirloom tomatoes, whether large or small, will add a lot of interest to the dish, with their vibrant colours, intense taste and interesting shapes.
  • I am not a big fan of raw onion, so I tend to use green onions as they have a milder taste. I wouldn't suggest using yellow onions, but finely chopped red onions could be substituted.
  • Lemon juice can be used instead of lime; I had a very juicy lime that I wanted to make use of. I also like the brightness that lime juice brings to a salad.
  • Add chopped fresh herbs such as parsley or cilantro.
  • Diced sweet peppers can also be added to the succotash...again, the variety of colours can give beautiful results. The peppers will also add a crunch to your succotash.
  • Add leftovers to wraps, quesadillas or omelettes.
  • The simple preparation of the chicken allowed the star of the meal, the succotash, to shine. The ground cumin was also a great flavour compliment to the corn, tomatoes and lime juice.
  • The succotash and zucchini can be accompanied by any meat or fish, or they can simply be a light dinner or lunch.

Wednesday, 5 August 2015

Rum Butter Basted Pork Tenderloin


The last pork tenderloin was defrosting in the fridge, and I still had no idea what I was going to do with it. Then I remembered the little bottles of rum that we had brought back from Hawaii...I checked the cupboard and the dark rum had about 1 tablespoon left in it. Why we didn't just use it instead of putting it back, I have no idea!

I chose to use the rum, together with some butter, cinnamon and cloves to make a spiced buttered rum baste for the pork. I grilled it, basting often, and the result was a rich, juicy and tasty dinner.

I was only cooking for 3 people, so one pork tenderloin was enough, together with everything else.

Turn the grill on to heat while you prepare the buttered rum.


In a small saucepan combine:

1 tablespoon dark rum
2 tablespoons butter
1 teaspoon honey
1/2 cinnamon stick
1 clove


Heat until the butter has melted. Remove from the heat, but keep warm.


I chose to cut the pork tenderloin into 3 equal sized pieces, so that each person received their own piece; this also allowed for more of the pork to be basted with the buttered rum.


Place the pork onto the lightly oiled, hot grill and lightly baste the exposed portions with the buttered rum. Turn the heat down to medium.

Turn the pork every 2 - 3 minutes to sear all sides, basting each time.


At this point, turn off the burner that is under the pork, allowing the indirect heat from the other burners to provide the heat. Keep the lid closed, except for when you baste and turn the pork, every 5 - 10 minutes.

When the pork is almost cooked, turn the burner underneath it on again, allowing the glaze to caramelize and give a lovely golden sheen to the outside.


Remove the pork from the heat, and allow it to rest for 5 minutes, before slicing and serving it.

  • As I only wanted a hint of spices in the background, I didn't use much. The amounts can easily be increased, or eliminated if that is what you want.
  • Other spices can be used...allspice, nutmeg, fresh ginger, garlic, cayenne pepper.
  • If you increase the amount of buttered rum you make you will have extra to use as a sauce when you serve the pork.
  • The pork can be cooked in the oven; drizzle the buttered rum over the meat once it has been seared and then spoon it over the meat every 10 minutes during roasting. The meat can also be quickly seared in a frying pan, and then placed to one side of the pan. Add the buttered rum and baste the meat as it finishes cooking. This method also works well if you have cut the meat into medallions, as they will cook faster.
  • The rum is optional...other liqueur or juice can be substituted. It can also be omitted and the spiced butter used alone.
  • If you have herb butter, use that, or use up any fresh herbs to make herb butter. Citrus zest or vanilla bean seeds can also be used to flavour the butter.
  • The buttered rum can be used for any meat...chicken breasts; chill some of it and tuck it under the breast skin of  whole chicken, use the rest to baste the chicken during roasting; whole ham, or ham steaks; salmon steaks.
  • The buttered rum can be made a few days ahead and kept in the fridge.


Monday, 3 August 2015

Homemade Herbed Pita Bread


I have been wanting to make pita bread for a while, and finally got the chance! I had no idea it was so easy, or that it would be so much fun! Watching the flat round of dough puff up in the oven, forming a pocket in the bread that can be filled with anything...magical.

I filled mine with a Mediterranean inspired burger, using up some yellow and green zucchini, eggplant and red pepper by grilling them and adding them to the pita pocket along with the burger, some feta cheese and homemade hummus (courtesy of my husband).

The recipe I used was my adaptation of one from www.thefreshloaf.com and I managed to make 11 pita breads from it. I added chopped fresh herbs from my garden as well as fresh ground black pepper. We had leftover pita bread, which was used up for lunches and snacking on the remaining hummus.


Combine the dry ingredients in the bowl of a stand mixer:

2 1/2 cups flour
1/2 cup wholewheat flour
1 1/2 teaspoons salt
1 tablespoon sugar
2 teaspoons active dry yeast
1/2 teaspoon freshly ground black pepper


Add the liquid:

1/4 cup chopped fresh herbs
2 tablespoons olive oil
1 1/4 cups warm water


Using the dough hook, mix the dough on a low speed until it comes together to form a slightly sticky ball. If you need more water, add a little at a time.

When you have achieved the sticky dough ball, allow the mixer to knead it for a few minutes, adding minimal amounts of flour as needed if it is sticking to the sides of the bowl.


Remove the dough from the mixer, onto a lightly floured counter.


Knead the dough until it is no longer sticky, adding flour if necessary. When the dough is soft and smooth, it is ready to be formed into a ball for proofing.


Place in a lightly oiled bowl and cover with plastic wrap.

Leave to rise until doubled in size.


Divide the dough into 11 pieces, each weighing 2.5 ounces.

Cover with a clean towel and leave to rest for 20 minutes.


During the resting time the dough balls will rise a bit, and they will also form a slight crust on the top.
Heat the oven to 500F and place a baking sheet on the middle rack, upside down. This will be your baking surface. Have a spray bottle of water ready next to the oven.

You will also need a cooling rack with a clean tea towel for the hot pita bread as it comes out of the oven.


Lightly flour a couple of baking sheets.

Roll the baking dough balls out into rounds that are about 1/4" in thickness. If you are having trouble rolling the dough, leave it to rest for a few more minutes.

Place the rolled dough rounds onto the lightly floured baking sheets.


Working as quickly as possible, open the oven, lightly spray the baking sheet with water and place 2 or 3 dough rounds onto the hot baking sheet.

Close the oven door and turn the temperature down to 450F.


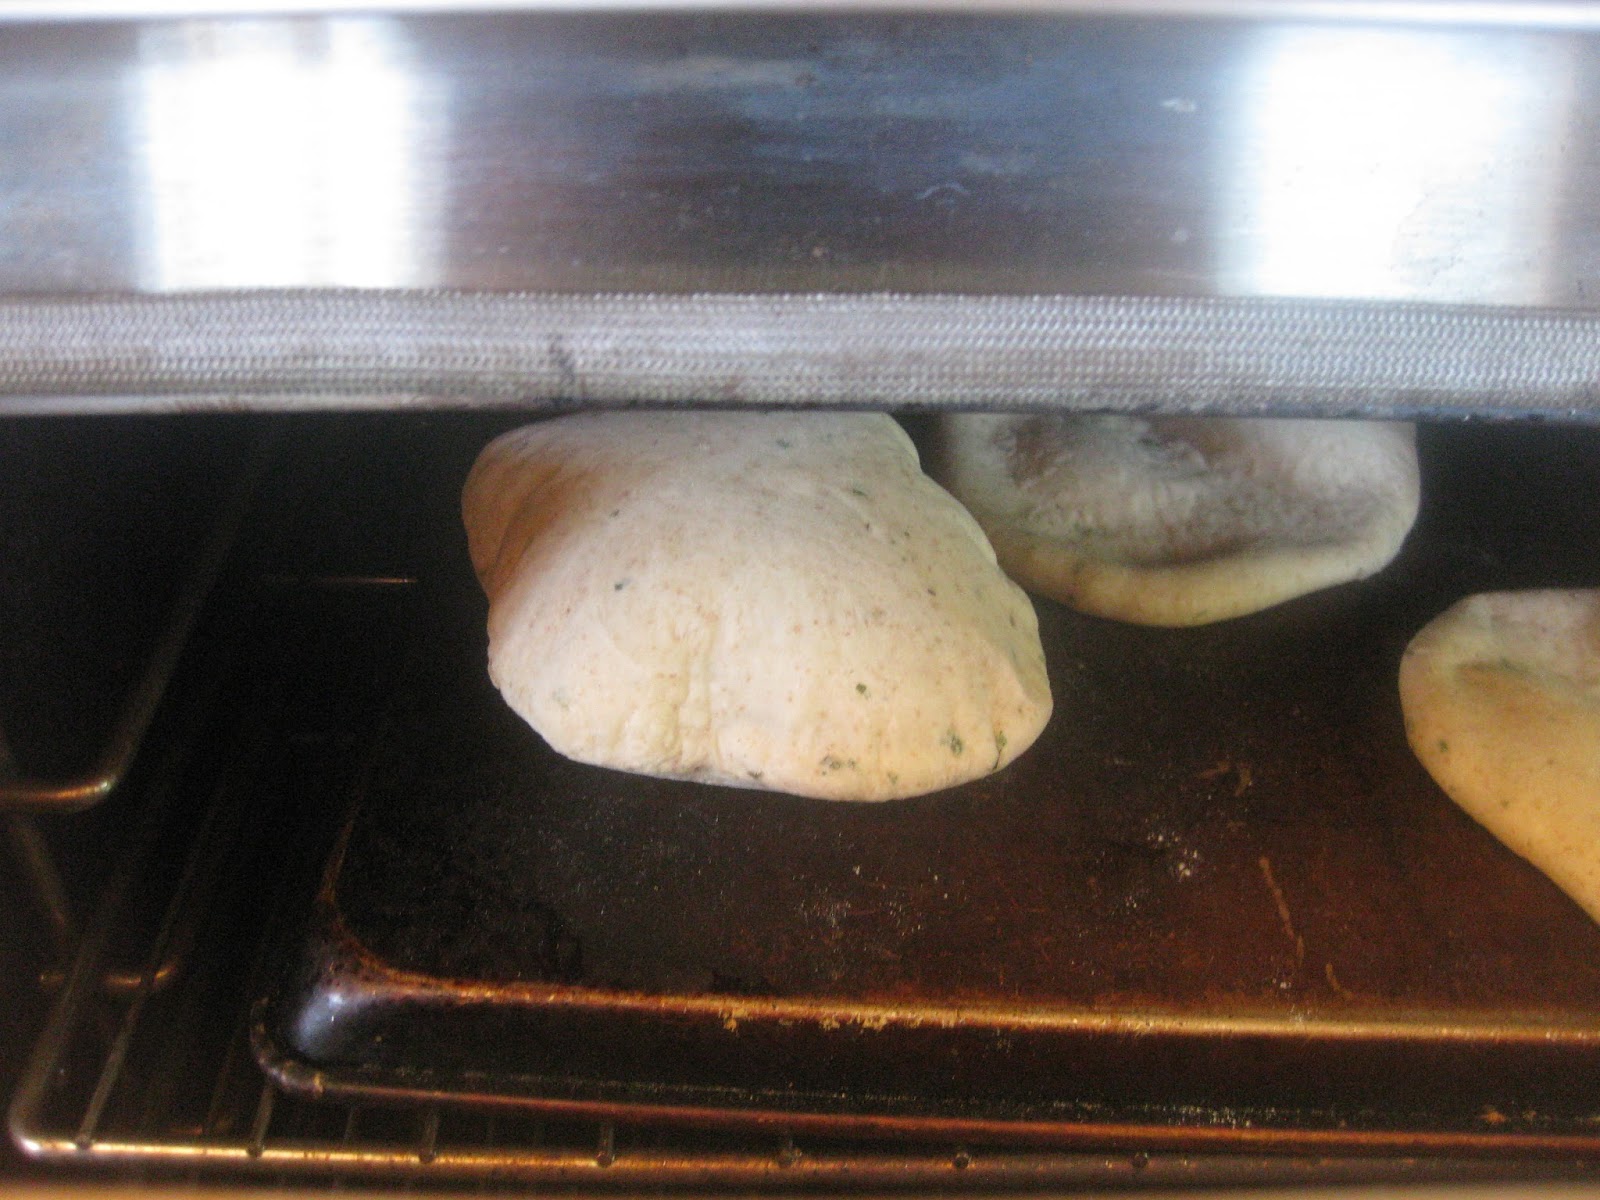
After 1 1/2 minutes the dough will have started to rise up.

Open the oven door and give another quick spray of water.


After 3 minutes, the pita bread will be done, nicely puffed up, as the one on the left in this picture is.

If the dough is not completely puffed up, leave it for another 30 seconds. The puffing up is what forms the pocket.


At this point, remove the bread from the oven.

Place the pita breads onto the clean towel, and wrap them. This allows them to cool down slowly, and also steams them a bit, keeping them soft.

The pita bread on the left is showing the bottom, the one on the right is showing the top.


The pita bread is now ready to serve. As I mentioned, I was making Mediterranean inspired burgers, and chose to make the pita bread to serve them in. This was a different, but delicious burger.


  • The herbs I used were basil, oregano, rosemary and chives. I used the same herbs in the burgers. Feel free to use any fresh, or dried herbs you like. If you are using dried herbs remember that the flavour is concentrated, so you need to use less.
  • Spices can be used as well...try crushed fennel seeds, chili flakes, cumin or coriander.
  • The herbs and spices can be omitted, giving you a plain pita bread. The wholewheat flour can be changed to all purpose if you wish.
  • Other oil can be used...vegetable oil, melted butter, nut oils such as peanut that can withstand a high temperature, flavour infused olive oil.
  • I like to do the first part of the kneading in the mixer, and then finish it off by hand. You can do all the kneading in the mixer if you prefer. The dough can also be made and kneaded completely by hand, the choice is up to you.
  • The thickness of the dough rounds play a role in the creation of the pocket. If the dough is rolled out thicker than 1/4" it is less likely to puff up and form a pocket. Pocketless pita breads are excellent for using as pizza crusts.
  • It is important that the oven is HOT when the bread dough is put onto the hot baking sheet. This is the reason that I heated the oven to 500F and then turned it down. The initial opening of the oven door will let some heat out, and this will ensure that the oven is still hot enough. The heat helps to form the steam that makes the dough puff up to form the pocket. If necessary, wait in between batches to ensure that the oven temperature is back up to 450F.
  • If you want a crispier bread, leave it in the oven for another minute or two. I prefer them to be on the softer side, and immediately enclosing the pita breads in a clean towel helps with this by allowing the residual heat in the pita breads to steam them as they cool down.
  • The pita bread can be filled with any filling of your choice...chicken salad; curried tuna salad with chopped apples; pulled pork; thinly sliced vegetables, fresh or grilled; scrambled egg...
  • Leftover pita bread can be cut into wedges, lightly tossed with olive oil, salt and ground cumin and spread in a single layer on a baking sheet. Bake at 325F until the pita wedges are crispy, and you have pita chips. These are a great lunch or snack, accompanied by hummus, tzatziki or egg salad.
  • Other cooking options for the dough are on the grill, the same as Grilled Pizza Crusts . The dough can also be cooked in a hot, dry frying pan.
  • Pita bread can be frozen, well wrapped, but when you taste it fresh from the oven, more than likely you won't have any left for freezing.