Wednesday, 29 July 2015

Grilled Asparagus and Ham Tart with Caramelized Shallots and Blue Cheese


Some asparagus, ricotta and blue cheese and shortcrust pastry dough were the inspiration for this dish. The pastry was in the freezer, which saved me some time; all I had to do was defrost it, roll it out and line a 10" tart shell. I could focus my attention on the filling.

While I was pulling the cheese from the fridge I saw that there were 6 slices of ham, so I added those to my ingredients.

Start by lining the tart shell, and place it in the fridge to chill while you prepare the filling. Heat the oven to 400F.


Using a bit of olive oil, caramelize:

1/2 cup thinly sliced shallots

Season lightly with salt and pepper.


When the shallots are caramelized, stir in:

1 cup ricotta cheese

Cook, stirring, until the liquid that the ricotta initially releases has reduced away.

Remove the pan from the heat.


Stir in:

2 tablespoons chopped fresh basil

Taste and adjust seasoning.


Place the chilled pastry shell onto a baking sheet.

Spread the ricotta cheese mixture evenly over the bottom of the chilled pastry shell.


Cut the ham slices into smaller pieces and lay them over the top of the ricotta cheese mixture.


Grill asparagus spears, just enough to add grill marks. Be careful not to overcook it at this point, as it will be cooked again when the tart goes into the oven.

Place the asparagus on top of the ham.


Whisk together:

1 cup milk
3 eggs
2 egg yolks
salt and pepper


Carefully pour the custard over the filling.

Over the top, crumble:

2 ounces of goat cheese


Place into the oven and bake for 10 minutes.

Reduce the oven temperature to 350F and continue to bake until the custard is puffed, golden and set.

Remove the tart from the oven and allow it to rest for 5  - 10 minutes to rest before removing it from the tart shell and serving it.


  • For the pastry, use the recipe from the post Goat Cheese Tart with Grape Tomatoes and Fresh Basil or the Roast Garlic Shortbread Quiche Crust.
  • The custard can be made with whipping cream, half and half or a combination of either of those and milk. This will add a lot of richness to the end result.
  • Instead of ham, you can use prosciutto, cooked bacon or pancetta.
  • Thinly sliced apple or pear can be used if you don't have asparagus; the apple slices can be grilled before adding to the tart. Other fruit options include fresh fig halves, peach or nectarine slices or grilled pineapple slices, grilled or not.
  • If you have zucchini, thinly slice it lengthwise and grill the slices, before laying over the top of the tart. For extra impact, weave the slices to create a lattice effect. This works really well if you have both green and yellow zucchini.
  • No shallots? Use thinly sliced onions or leeks.
  • I happened to have a basil plant growing on my kitchen window sill. If this was not the case, I would have picked fresh thyme or chives from the herb garden. Rosemary can also be used if you like.
  • Cheese options are endless, but I like the combination of the blue cheese with the asparagus. It also works well with the fruit options; goat cheese does too. Other options are up to personal taste and availability...Parmesan, cheddar, asiago, brie to name a few.
  • The tart shell can be lined ahead and either frozen, or refrigerated, well wrapped. It can be kept in the fridge for a couple of days before being filled and baked.
  • Leftover tart is great for breakfast or lunch the next day.

Monday, 27 July 2015

Roasted Chicken Thighs with Navy Bean and Grape Tomato Ragout


I have always found it interesting how often the weather influences our choice of food. After almost 3 months of hot, dry weather we had a couple of days of rain...the cooler weather made me think of warmer weather food, even though the temperature was still pretty summery!

Remembering the can of navy beans I had bought a few weeks ago, and not yet used, I decided to make a Tuscan style bean ragout, and serve it with crispy roasted chicken thighs. The chicken stock in the freezer would also get used, as well as some of the fresh sage and rosemary in the herb garden.


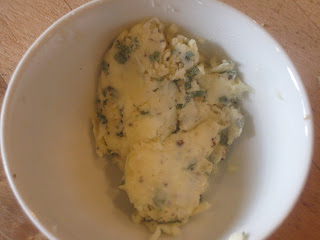
Start off by making a garlic and sage butter.

Combine:

1/4 cup softened butter
2 cloves minced fresh garlic
6 leaves finely chopped fresh sage
salt and pepper to taste


Divide the herb butter between the chicken thighs (I had 9).


Gently lift the skin and place the butter underneath, covering it when you are done, pressing the butter into an even layer under the skin.

Lightly season the chicken thighs with salt and pepper. Heat the oven to 375F.


Use a pan that can be transferred to the oven, and heat a drizzle of olive oil. When the pan and oil are hot, add the chicken thighs, skin side down.

Allow the skin to brown before turning the chicken over. Turn off the heat.


Carefully drain the fat from the pan. This will be  a combination of chicken fat and herb butter. Save the fat for the beans. It is full of flavour and will add a lot to your ragout.

Place the pan of chicken thighs into the oven to finish cooking. This should take about 45 - 60 minutes, enough time to make the bean ragout.


Season 2 cups of grape tomatoes with salt and pepper, drizzle with olive oil and place in the oven to roast. 


When they start to burst,remove them from the oven. This should take about 10- 15 minutes.


In a pan, heat 2 tablespoons of the fat you reserved from browning the chicken.

Add:

1/4 cup minced shallot
1 carrot, finely diced

Cook on a low heat until the vegetables are soft.


Add:

2 sprigs of fresh rosemary
1 clove garlic, peeled
salt and pepper

Cook for a couple of minutes.


Add:

1 can of navy beans that has been drained and rinsed with cold water.


Add enough chicken stock to cover the beans and vegetables, and leave it to simmer. When both the beans and carrots are tender, your ragout is ready.

Add more chicken stock if necessary; it will be absorbed by the beans as they cook.


Taste and adjust the seasoning.

Stir in the roasted grape tomatoes.

Remove the rosemary sprigs.


When the chicken thighs are cooked, remove them from the oven and allow them to rest for 5 minutes before serving.


Serve a portion of the bean ragout in a bowl, placing the crispy roasted chicken thighs on top.


  • The consistency of the bean ragout is a bit looser than that of baked beans, but feel free to adjust it to the consistency you prefer by adding more, or less, liquid.
  • Other liquids can be used...vegetable stock, water, part wine, or beef stock if you are using meat such as beef or lamb.
  • Do not add too much salt at the beginning of the cooking process, rather adjust it at the end. Often the salt that is in the chicken stock will be enough, especially as it reduces down during cooking and concentrates.
  • Some people advise not to use salt while cooking beans, as it can make them tough. There are others who say that the addition of salt will help to give a more tender bean. Try both and decide for yourself.
  • If you want to use dried beans instead of canned, remember to soak them overnight before cooking them. The cooking time will increase, anywhere from 30 minutes to 2 hours, depending on the type of bean you are using, as well as how long they soaked for.
  • Other beans that can be used for this recipe are cannellini, Great Northern or white kidney beans.
  • I kept the ragout simple, only using shallot and carrots as the vegetables, but you may add as many vegetables as you like. Red peppers, zucchini, mushrooms and spinach are some to try.
  • The roasted grape tomatoes added sweetness and a burst of juice...peeled and diced tomatoes or canned tomatoes can be substituted if you like.
  • Diced bacon or pancetta can be cooked along with the vegetables, before adding the beans and liquid. 
  • The beans can be cooked, covered, in a low oven for a few hours. Check on them regularly to make sure that there is still enough liquid.
  • The ragout can be turned into a soup simply by adding more liquid; add some cooked spicy Italian sausage if you have some, pair it with some crusty bread and you have dinner or lunch ready to go. This is a great way to use up any leftovers. 
  • Even though a lot of the herb butter melts when browning the chicken, it still adds flavour, richness and moisture to the thighs, as some of it does penetrate the meat. The garlic and chopped sage remain under the skin, giving a burst of flavour when you are eating the chicken. The butter also helps crisp the skin.
  • Using the chicken fat and melted herb butter to start the beans adds a lot of flavour to the ragout. 
  • The chicken can be browned and then braised with the beans, adding more chicken flavour to the beans.
  • Instead of chicken consider using Italian sausage, ham hocks, beef shortribs or lamb shanks...braising them all along with the beans. Dried beans will work best for this as both the beans and the meat will take longer to cook than canned beans do.
  • This made enough for 3 people.

Thursday, 23 July 2015

Caramel Apple Cake with Cinnamon and Aniseed


There were 4 apples in the fruit bowl, and they were all a bit on the soft side. Still good, but not nice and crunchy, the way I like them to be when I'm eating one. I used them to make an upside down cake for dessert, and also finished off the last bit of sour cream at the same time.

Start off by cooking the apples...this allows them to cool before putting the batter on top of them.


Peel and slice 4 apples. I cut each one into 3/8" thick slices.


In a large, heavy bottomed skillet, melt:

2 ounces butter

Add:

3/4 cup brown sugar

Cook, stirring, over medium heat until the sugar and butter are well combined.


When the butter and sugar start to bubble, add:

1 teaspoon vanilla
1/2 teaspoon cinnamon


Add the apples to the pan. The caramel will seize up, but it will melt again as the apples heat up and release their juice.

Cook over a low heat, stirring occasionally, until the apples are just tender.


Using a slotted spoon, remove the apples from the caramel and allow them to cool.

Save the caramel for the cake.


Put the apples into a heavy bottomed skillet, that can go directly into the oven. I used one that is about 10" diameter.

Turn the oven on to 350F.


Using an electric mixer and the paddle attachment, cream:

6 ounces butter
3/4 cup brown sugar
1/2 teaspoon ground aniseed
1/2 teaspoon ground cinnamon


Add:

1 egg
1 egg yolk
1 teaspoon vanilla

Mix well to combine, scraping the bowl down halfway through.


Measure the dry ingredients into a small bowl:

1 1/2 cups flour
3/4 teaspoon baking powder
3/4 teaspoon baking soda

Add half to the batter.


Add the wet ingredients:

The caramel from cooking the apples
Sour cream to bring it up to 3/4 cup in total

Mix to combine, scrape the bowl down.

Add the remaining dry ingredients.


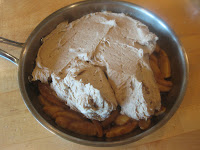
Scrape the batter on to the apples, and spread evenly over the fruit.


Place into the pre-heated oven and bake until the cake is golden, slightly cracked and a wooden skewer inserted into the cake comes out dry. This took about 40 - 45 minutes.


Leave the cake to cool for 5 - 10 minutes before placing a large plate over the top of the skillet and inverting it.

This allows the cake to unmould, leaving you with the sweet, soft apples on top of the moist, spicy cake.


Cut and serve, warm or at room temperature, alone or accompanied by whipped cream or vanilla ice cream.


  • Other fruit can be used in the same way...try pears, peaches, plums, apricots or rhubarb.
  • Use spices that you like, have a lot of or you feel compliment your choice of fruit best. Some suggestions include fresh or ground ginger (peaches, plums, pears); nutmeg, cloves or allspice...use sparingly as they are all very strong; ground fennel seeds (apples or pears); ground star anise (plums); cardamom (pears or plums); ground pepper; chopped fresh rosemary (peaches or rhubarb).
  • Use a spice grinder to grind whole spices such as aniseed, fennel seeds, cardamom or star anise.
  • The caramelized fruit can be drained in a colander; I like to use a slotted spoon to scoop it out.
  • Another option for the cooking caramel is to add whipping cream to it and make a caramel sauce.
  • If you use the cooking caramel to make a sauce, use the full 3/4 cup of sour cream or plain yoghurt.
  • Nuts, chopped or whole, can be placed in the bottom of the skillet before adding the fruit and batter. Pecans, almonds or hazelnuts work well for this.
  • During the short fresh berry season, spread the batter into the bottom of a parchment lined springform pan, and top with 3/4 cup of fresh berries, and sprinkle with 1 tablespoon of white sugar before baking. The batter will rise up around the berries, partially covering them.
  • The cake batter can be brightened with the addition of lemon or orange zest. Nuts, chocolate chips or toffee bits can be folded into the batter as well.
  • For a slightly more elegant twist on this cake, use individual moulds such as ramekins or muffin tins. Lightly grease them and sprinkle the inside with white sugar mixed with a bit of cinnamon. Place a scoop of batter into each one, filling it no more than 2/3 full. Cut fresh peaches, plums or apricots in half, removing the pit. Place one half into each mould, cut side up, gently pressing the fruit down so that the cut edge is only slightly above the batter. Bake. Allow to cool before removing from the moulds...the fruit juice is very hot!
  • Serve the cake warm, or at room temperature. Accompany it with whipped cream, ice cream, mascarpone cheese with a bit of vanilla and lemon zest folded into it.

Saturday, 18 July 2015

Cornbread with Bacon and Pepper Jack Cheese


This is my go to cornbread recipe, adapted from The Silver Palate Cookbook (Julie Rosso and Sheila Lukins with Michael McLaughlin). It is quick and easy to make, a perfect moist yet crumbly texture, soaks up sauces very well and is very adaptable to changes in some of the ingredients.


There is only one downside to this cornbread, in my opinion, and that being that it doesn't keep well. This isn't usually a problem though, as we usually manage to eat it all! I made this to serve with the
Apple Braised Country Style Pork Ribs with Apple BBQ Sauce.

Start off by pre-heating the oven to 350F and lining an 8" X 8" pan with parchment paper. This makes removing the cornbread from the pan effortless, and allows you to cut and serve it very easily.


In a large bowl, combine the dry ingredients:

1 cup flour
1 cup cornmeal
1/4 cup sugar
2 1/2 teaspoons baking powder
1/4 teaspoon salt


Whisk together the wet ingredients:

1/4 cup sour cream
3/4 cup milk
1 egg
3 ounces melted butter, that has cooled


Add to the dry ingredients:

4 rashers of bacon, diced and cooked until crispy
1/2 cup corn kernels
1/2 cup grated pepper Jack cheese


Add the wet ingredients to the dry and mix until just combined.


Scrape the batter into the prepared pan and bake until the top starts to crack and go golden, and a wooden skewer inserted into the middle comes out clean.


Allow the cornbread to cool in the pan for about 5 minutes before using the parchment paper overhangs to lift the cornbread out of the pan and onto a cutting board.


                                Cut into squares and serve while it is still warm.


  • The original recipe calls for buttermilk, but I didn't have any so I combined sour cream and milk. This resulted in a richer cornbread. Yoghurt can be used with the milk, the milk can be soured with lemon juice or vinegar.
  • If you are using salted butter, omit the salt. There is enough salt in the butter as well as in the cheese and bacon.
  • Variations on the recipe include: omit the bacon and use chopped green onions; sprinkle the cheese on top of the batter instead of mixing it in; use grilled corn on the cob instead of flavoured corn; dice pickled jalapenos and add to the  batter; mix 1 teaspoon of the adobo sauce from canned chipotle chilies into the liquid ingredients and add some minced chipotle to the batter; dried spices such as cumin, ancho chili or cayenne can be added to the dry ingredients.
  • Serve the cornbread with pulled pork, baked beans, chili...anything with sauce. It can also be served with soup.
  • Place dollops of the batter on top of a thick chili and bake to create a 'cobbler' style dish.
  • Freeze leftover cornbread to use for stuffing, as I did for the Roasted Chicken Breasts Stuffed with Cornbread and Spinach.
  • Use olive oil, vegetable oil or avocado oil instead of butter. You need 6 tablespoons of oil.

Friday, 17 July 2015

Apple Braised Country Style Pork Ribs with Apple BBQ Sauce


It's a good thing we don't eat like this very often, because I don't think our arteries could stand it! As a treat, however, ribs are a wonderful, messy, tasty dinner! Paired with homemade cornbread, still warm from the oven, and coleslaw, how could I go wrong?!

I bought the ribs a few weeks ago, just because I really wanted ribs, and they have been in the freezer ever since. Then I remembered the can of unsweetened applesauce that I had (I was making vegan cookies and bought too much)...this would be perfect to use in a BBQ sauce!

Start the ribs the day before you plan  to cook them, as they need to sit overnight with a rub.


 To make the rub, combine the following:

 2 tablespoons brown sugar
1 teaspoon paprika
1 teaspoon ground cumin
1/4 teaspoon dried ancho chili powder
1 teaspoon garlic powder
1 teaspoon sea salt


Set aside 2 tablespoons of the rub to use in the BBQ sauce. Keep it in a well sealed container.


Sprinkle the remaining rub over the ribs, and gently massage it into the meat, making sure that all sides of the meat have some of the spices on them.

Cover and refrigerate overnight.


The day you will be cooking the ribs, heat the oven to 275F. Heat a large frying pan that can also be placed directly into the oven. Add a drizzle of olive oil, just enough to prevent the ribs from sticking.


Quickly brown all sides of the meat.

Add:

3/4 cup apple juice.


Bring to a boil.


Cover the pan and put it into the oven, leaving the ribs to cook slowly for 2 -  2 1/2 hours.

At this point they should be cooked through and very tender. I left mine to cool in the oven, before removing from the pan and putting into the fridge to firm up before grilling.

Save the braising liquid to use in the sauce.


While the ribs are braising, make the BBQ sauce.


 Heat a bit of olive oil and cook:

1/4 cup diced onion until it starts to soften.

Add:

The 2 tablespoons reserved rub and cook for 2 minutes, stirring.


Add:

3/4 cup unsweetened applesauce
3/4 cup ketchup
1/2 teaspoon ground cumin
1/4 teaspoon dried ancho chili powder
2 tablespoons apple cider vinegar

Cook, stirring until it is well combined.


Skim as much fat off the top of the reserved braising liquid as you can, and add the liquid to the sauce.


Simmer until the sauce has thickened to the consistency you like; I cooked mine for about 20 minutes.

Taste and adjust seasoning...I added a bit more ancho chili.


Place the ribs onto a hot grill to re-heat, brushing them with BBQ sauce.


Serve the hot ribs with coleslaw, warm cornbread with bacon and pepper Jack cheese (recipe to follow tomorrow) and pass the extra BBQ sauce at the table. Don't forget the napkins!!!


  • For the rub I used roasted garlic powder that I made by grinding dried roasted garlic flakes in my spice grinder. This gave a milder garlic flavour than regular garlic powder would.
  • Next time I will double the amount of dried ancho chilies as the intensity of the heat was quite mild. Dried chipotle chilies will give a smokier flavour, and can also be used in the BBQ sauce, for heat and smokiness.
  • The rub will keep for a few weeks, as long as it is well sealed, so make as much as you want, it always comes in handy for recipes like Sticky Smoked Chicken Wings.
  • Check the ribs during braising after 1 1/2 hours for doneness. Mine were literally falling off the bone, and I had to be quite careful while grilling them. You want them to be tender, as they will only be re-heated on the BBQ, not cooked.
  • The ribs can be re-heated in the oven at 350F. Place them in a single layer and baste with the BBQ sauce. Place into the oven until heated through.
  • If you don't have canned applesauce, you can make your own by dicing 2 - 3 apples (depending on the size) and cooking them with a bit of water until tender enough to mash with a potato masher.
  • Apples that have been peeled and cut into eighths can be cooked with the pork while it braises, and then added to the onion, spices, ketchup and vinegar when you make the sauce.
  • Onions and garlic can be added to the pork when it braises.
  • Use 1/2 cup apple juice and 1/4 cup bourbon when braising the pork and you will have a bourbon apple BBQ sauce.
  • When you taste and adjust the seasoning, you can add more heat (chili), acid (vinegar) or sweetness (brown sugar). 
  • If you want a rich, dark sauce, add some molasses as well. This adds sweetness too, but not in an obvious way, adding depth of flavour and colour more than anything.
  • The pork can be braised up to 2 days ahead, and the sauce can also be made ahead. They can both also be frozen at this point, to be defrosted and re-heated for serving.
  • I used up some applewood smoked bacon and pepper Jack cheese in the cornbread, and I will share that recipe tomorrow. It is very rich and moist, and is excellent for soaking up the sauce.