Tuesday 29 March 2016

Mozzarella Stuffed Cauliflower Balls


If you love cauliflower, or are relatively neutral towards it (as I am) you'll enjoy these. I had cooked a whole cauliflower for dinner the night before, and had about half of it left over...it was a pretty huge cauliflower!

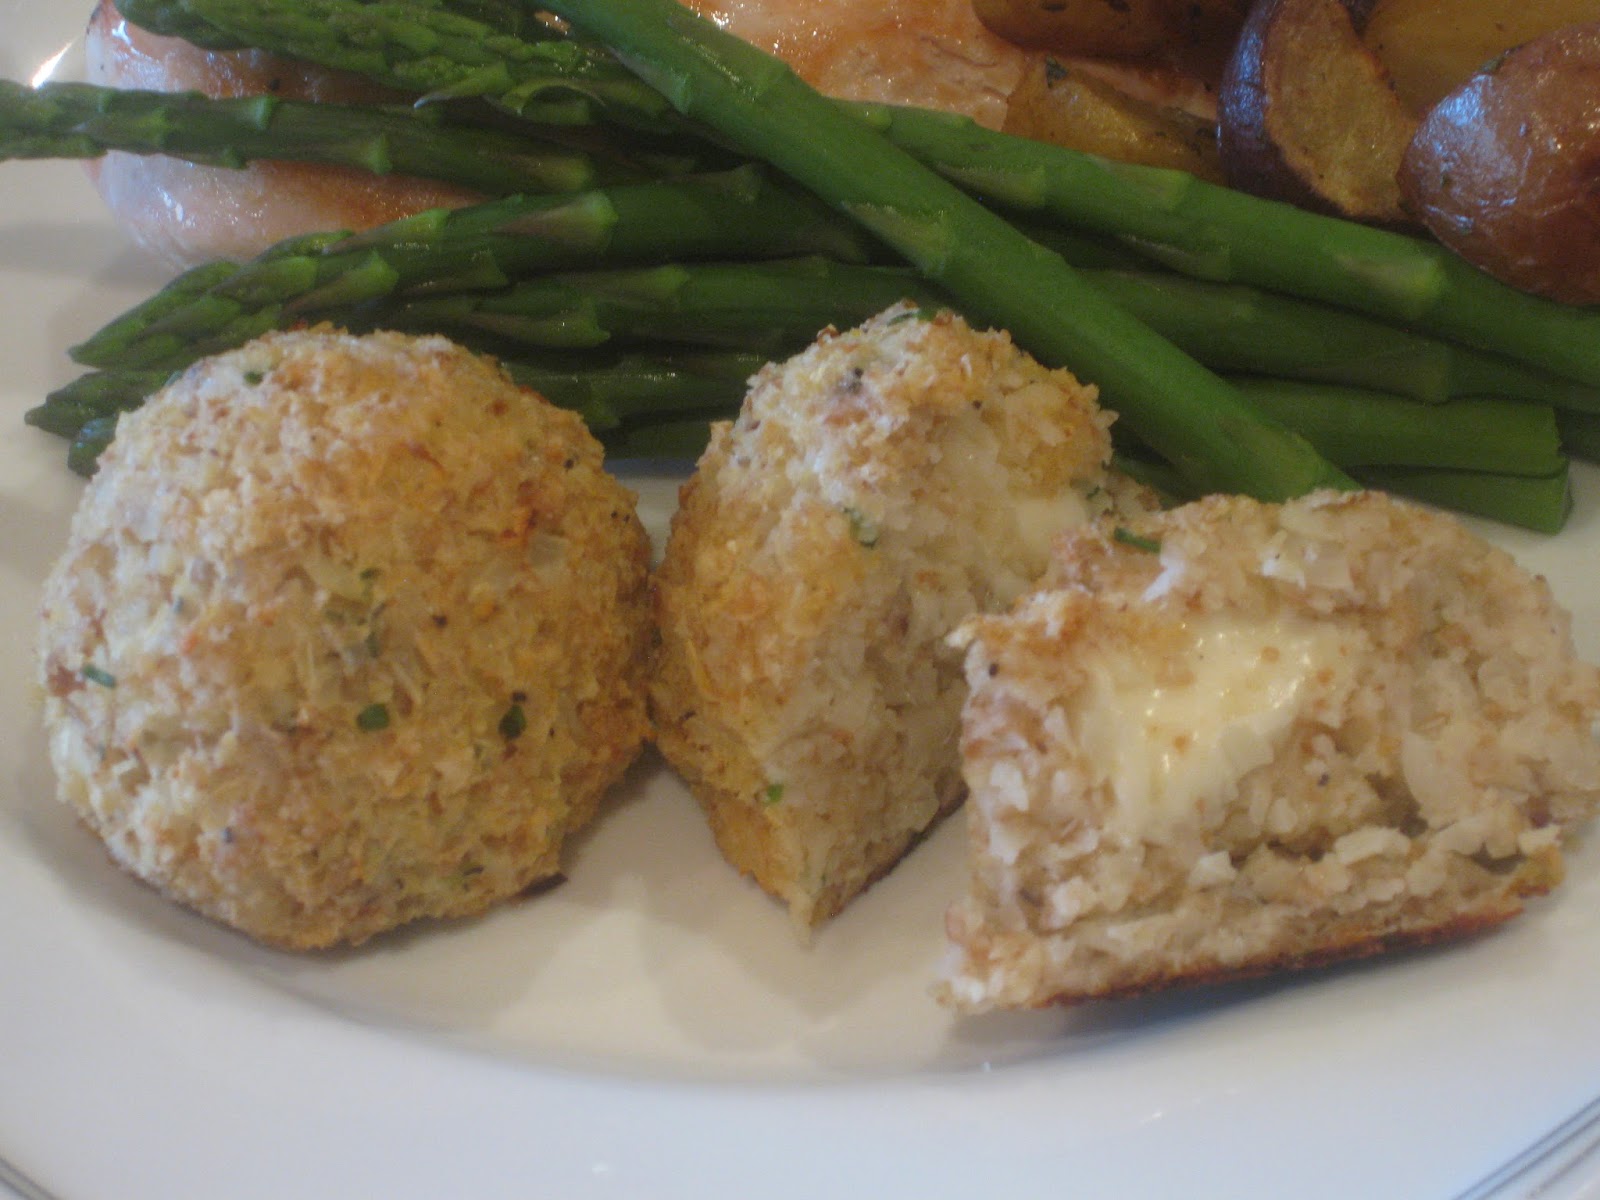
Time to try something new! I turned the cauliflower into little balls, by adding some Parmesan, herbs, egg and breadcrumbs. While forming the balls I remembered the mozzarella in the fridge, so I hid a piece of the cheese inside each cauliflower ball...it melted while they baked, leaving a gooey surprise inside.

The recipe made eight balls, enough for two each. I chose to bake them at a high temperature instead of frying them. The outside was still crisp, but frying would give a much crispier texture.

I was using leftover cooked cauliflower. If you don't have any, cut about four cups of cauliflower florets and stems and cook in lightly salted boiling water until just tender. Drain, run under cold water and allow any excess water to drain off before proceeding.


Place the cauliflower into a food processor. I had:

4 cups


Process until the cauliflower is in small pieces, about the size of roughly chopped garlic.


Place the cauliflower into a large bowl with:

2 handfuls of grated Parmesan
1/2 teaspoon salt
1/2 teaspoon black pepper
1 egg
1 teaspoon chopped fresh thyme
2 teaspoons chopped fresh chives


Mix well to combine, and then add the breadcrumbs, half a cup at a time, until the mixture is firm enough to hold together when shaped into balls.

I used:

Between 1 1/2 - 2 cups of breadcrumbs


Scoop a half cup portion of the cauliflower mixture into your hands, and form it into a ball.

Press it flat, and insert a cube of mozzarella into the centre. Reform the ball, enclosing the cheese completely.


Gently roll the ball in your hands to form a uniform round shape, and place onto a baking sheet.

Do the same with the remaining cauliflower mixture.


Place the cauliflower balls into the fridge to chill while the oven heats to 400F. Place the cauliflower balls into the oven and bake until they are crispy on the outside, and hot all the way through. This should take at least 30 minutes, depending on the size of your balls. Check the inside temperature by sticking a metal skewer into the centre of one of the balls.


Serve the balls while they are still hot!


  • These are not as time consuming as they might seem at first glance. Once the cauliflower is cooked, it takes hardly any time to assemble them, and while they bake you are free to take care of the rest of dinner.
  • Cooked broccoli can be substituted for cauliflower. If you are able to find one of the coloured cauliflowers (purple, green, orange) use that instead, especially if you have young children...multi-coloured food is always so much more fun to eat!
  • I chose to bake them, but you can also shallow or deep fry them, or even just brown them in a pan and then put them into the oven to cook through. By using oil you will achieve a crispier outside, with a more golden colour.
  • Another option is to bread the cauliflower balls before cooking them. This can be done either by rolling them in breadcrumbs, or by setting up a traditional breading line with flour, eggs and breadcrumbs.
  • Any kind of cheese can be placed in the centre, preferably one that will give a gooey result...cheddar, havarti, goat cheese, bocconcini, Brie or Cambozola.
  • Don't limit yourself to cheese. Why not hide something like roasted garlic, tapenade or pesto in the centre. If you choose to stuff the balls with something that is not as firm as cheese, consider freezing small blobs of the filling to make the assembly easier and less messy.
  • Use the opportunity to add as much flavour as you wish to the cauliflower mixture. Spices such as paprika, cayenne pepper or nutmeg; chopped fresh herbs such as basil, dill or tarragon; hot sauce or Dijon mustard; strong flavoured cheese such as blue cheese or asiago; chopped nuts such as hazelnuts.
  • Make the size of the cauliflower balls smaller, and you have a lovely canape. Flatten the balls and you can turn them into pancakes.
  • These can be assembled a day ahead; they can also be frozen. Bake from frozen, allowing extra time.

Sunday 27 March 2016

Mango and Tamarind Baby Back Ribs


We had two slabs of Danish baby back ribs, and my husband wanted to put them on the smoker, which is what usually happens when we have ribs, but I wanted something different. I had a small container of mango juice that was sitting on the shelf, and this was an opportunity to use it.

I made a braising liquid for the ribs using the mango juice, some tamarind pulp and a few other pantry ingredients. The ribs were smothered in this sauce and cooked for a few hours in the oven until they were literally falling off the bone. A hit all around, and one to make again!


In the blender, combine:

1 cup mango juice
1 cup hoisin sauce
1/4 cup soy sauce
2 tablespoons Balsamic vinegar
2 tablespoons tamarind pulp
1 tablespoon minced fresh ginger
1 tablespoon minced fresh garlic
1 teaspoon sriracha
1/2 teaspoon ground cinnamon


Blend until you have a reasonably smooth liquid. Cut two racks of baby back ribs into sections of 3 to 4 ribs each; this makes serving a whole lot easier.


Place the ribs into an ovenproof dish large enough to hold them in one layer.

Pour the sauce over the ribs.


Gently turn the ribs, making sure that they are well coated with the sauce on all sides.

Spread them out into a single layer again.

Cover the dish with foil and place into a 325F oven.


Bake for 2 - 3 hours. Check to see how tender the meat is, placing the ribs back into the oven, covered, to cook for longer if necessary. When the meat is tender, and almost falling off the bone, remove the foil and place back into the oven to crisp up a bit.

I served the ribs with coconut rice, and fresh asparagus. The remaining sauce was drizzled over the ribs and rice. Have a lot of napkins ready, and don't be afraid to use your fingers and make a mess!


  • Even though there is a fair amount of sugar in this sauce, between the mango juice and the hoisin sauce, the sweetness is well balanced by the salty soy sauce, the acidic vinegar and the citrusy tamarind.
  • Any type of tropical juice can be used...guava, papaya, passionfruit, pineapple. A blend of juices can also be used.
  • I had finished my tamarind concentrate and when I went to buy more, the store I was at only had tamarind pulp in stock. If you use pulp, make sure there are no seeds or pieces of pod in it before blending it. If you use concentrate then you can use half the amount of tamarind called for in the recipe. You will also have a smoother sauce, and it can be whisked together by hand instead of blended.
  • Tamarind pulp can be stored well wrapped at room temperature, in the fridge or in the freezer. Tamarind concentrate should be stored in the fridge once it has been opened. It lasts indefinitely.
  • I prefer to use tamari soy sauce, as I find the flavour more pleasing. It has been aged, or fermented, and tends to have a softer, less salty taste. It is also often gluten free, whereas regular soy sauce often contains gluten.
  • Sambal oelek can be used instead of sriracha; crushed dried chilies can also be used. The amount of heat in your sauce depends on what you like, so adjust it accordingly.
  • The cinnamon adds a bit of sweetness to the sauce. Other spices that would work well are Chinese five spice or star anise.
  • If you like a lot of sauce with your rice, double the recipe.
  • The ribs can be marinated overnight in the sauce, before baking them. If you choose to do this, make sure that any marinade gets well cooked before being used as a sauce....either in the oven with the ribs, or brought to a boil in a pot.
  • Once the meat is tender, the ribs can be finished off on the barbecue. Save the sauce and use it to baste them as they finish cooking.
  • If you happen to have leftovers, pull the meat off the bones and use it to stuff wraps, to top pizza or to make stirfried rice or noodles.
  • I used baby back ribs, but any type of rib can be used. If you choose to use country style ribs, I recommend marinating them overnight as there is a lot more meat that needs tenderizing.

Thursday 24 March 2016

Turkey, Bacon and Brie Club Sandwhiches


A tiny handful of fresh raspberries, some cooked turkey and the last four pieces of bacon inspired this sandwhich. I used a multigrain bread, turned the raspberries into a raspberry-basil mayonnaise, sweetened and spiced up the bacon with maple syrup and hot sauce and used the creaminess of the Brie to bring it all together.

The only thing I would do differently next time is to toast the bread...

This is a perfect lunch, or light dinner, and can also be divided into two separate sandwhiches if you like.

Start by heating the oven to 350F and lining a baking sheet with foil or parchment paper. Place a rack on top of this.


Cut 4 pieces of bacon in half and place onto the rack.

Stir together some maple syrup and hot sauce. Drizzle this over the bacon and place in the oven to cook.

Cook the bacon for 25 - 30 minutes, turning and basting with the maple syrup every 10 minutes.

Remove from the oven and allow to cool.


In a small bowl, mash:

a small handful of fresh raspberries

Stir in:

2 tablespoons chopped fresh basil
1/4 teaspoon ground black pepper
3/4 cup mayonnaise


Begin to build the club sandwhich:

Spread some raspberry basil mayonnaise onto a slice of multigrain bread.


Top the mayonnaise with a handful of mixed greens, and then the thinly sliced turkey.


Add a layer of thinly sliced Brie.

Top this first layer of the sandwhich with another slice of multigrain bread, that has been spread with some more of the raspberry mayonnaise.


Start to build the second layer:

Add some thinly sliced roasted red peppers.


Top the red peppers with 3 pieces of the bacon.


Top the sandwhich with the final piece of multigrain bread, that has been spread with some more of the mayonnaise.


  • This recipe made four sandwhiches, and there was a small amount of mayonnaise left for a lunch sandwhich the next day.
  • I had some cooked turkey breast left from another meal that I used for the sandwhich. You can use other meat such as cooked chicken, pork or ham. All of these will work well with the raspberry mayonnaise, as well as the sweet and spicy bacon.
  • Another idea for the bacon is to coat it with brown sugar and either black pepper or dried chilies. Placing it onto a rack allows it to crisp, as the fat drips away from the bacon. 
  • I used Brie because of it's mild flavour and creamy texture. Cambozola has a similar texture, but a stronger flavour. Goat cheese can also be used.
  • Adding flavour to store bought mayonnaise can add so much to a sandwhich. It's a simple thing to do; use your imagination and whatever you have at hand. Some suggestions include raspberries and black pepper; maple syrup and mustard; pesto; tapenade; minced sundried tomatoes and basil; lemon zest, fresh thyme and black pepper.

Sunday 20 March 2016

Tandoori Chicken Soup


With a request for Indian food for dinner, but no suitable meat to use, I decided to use the frozen chicken tenders to make a soup, using all the spices and flavours of tandoori chicken, and adding some canned tomatoes, chicken stock and coconut milk to make a broth.

When I make tandoori chicken I usually marinade the meat in yoghurt and spices, but as I only had a small amount of plain yoghurt I saved that for serving, and used up the last bit of buttermilk for the marinade. This allowed me to use both up at once, as well as the coconut milk that was in the fridge, leftover from a previous meal.

The result was delicious...served with naan bread and a dollop of plain Greek yoghurt; we ate it all! The recipe will serve four people...there were only two of us, but my husband had seconds and ate the last portion for lunch the next day. I guess I'll be making this again!


In a dish suitable for marinating, combine the spices:

1/2 teaspoon chili powder
1/4 teaspoon salt
1/4 teaspoon black pepper
1 teaspoon minced fresh ginger
2 teaspoons minced fresh garlic
1/2 teaspoon paprika
1/2 teaspoon garam masala
1 teaspoon tandoori masala


Stir in:

3/4 cup buttermilk
Juice of half a lemon


Add:

8 chicken tenders

Mix gently, making sure that the chicken is well coated with the marinade.

Cover and refrigerate for at least 30 minutes.


Heat a large pot, suitable for making soup in, and add a drizzle of olive oil

Cook the chicken tenders, allowing any excess marinade to drip off before adding them to the pot.

Discard the remaining marinade.

When the chicken is cooked, remove it from the pot and set aside until needed.


Turn the heat down to medium and add another drizzle of olive oil. Add:

1 medium red onion, thinly sliced
2 teaspoons garlic, minced
1 teaspoon fresh ginger, minced

Cook, stirring often,until the onions have softened.


Add the rest of the spices:

1/4 teaspoon fenugreek seeds
1/2 teaspoon paprika
1/2 teaspoon garam masala
1/4 teaspoon sugar

Cook, stirring, for two minutes.


When the spices have cooked and are fragrant, add:

2 tablespoons tomato paste

Cook, stirring, for another two minutes.


Stir in:

1 14 ounce can of crushed tomatoes


Add:

3 cups of chicken stock

Bring to a boil, then turn down and simmer for 30 minutes, or until the onions are very soft.


Shred or dice the cooled, cooked chicken tenders.


Add the chicken to the soup, and simmer for another 5 minutes.

Add:

3/4 cup chick peas


Stir in:

1/2 cup coconut milk

Taste and adjust seasoning.


Serve the soup, garnished with a dollop of plain Greek yoghurt, and accompanied by warm naan bread.


  • When making tandoori chicken, a tougher part of the chicken is usually used...thighs or drumsticks, so marinating is important for tenderizing as well as adding flavour. Chicken tenders, as the name says, are the most tender part of the chicken and do not need tenderizing. However, with thirty minutes in the marinade, a lot of flavour is added.
  • If you choose to use chicken thighs or drumsticks, leave them in the marinade for at least 6 - 6 hours, or even overnight.
  • Cooking the chicken with some of the  marinade increases that flavour, and also adds some of that spiciness to the pot. This is transferred to the vegetables and the broth when they are cooked in that same pot.
  • If you wish to use yoghurt for the marinade, substitute it directly for the buttermilk.
  • To make tandoori chicken, remove the chicken from the marinade and grill it. Serve it with rice or naan bread, or use it for sandwhiches, wraps or as a pizza topping.
  • Coconut milk is optional; use whipping cream instead, or omit it completely. It does add creaminess to the soup, which helps to cut through the acidity of the tomatoes. The little amount of sugar that is added does the same thing. If you find that the broth is still to acidic, add a bit more sugar.
  • This soup is a great way to use leftover cooked chicken; you will need to increase the spices in the broth. Add the spices from the marinade to the onions during cooking.
  • I added chick peas to my soup; they can be omitted or another type of beans can be used instead. If you want to make the soup vegetarian, instead of chicken add more chick peas, as well as vegetables such as carrots, eggplant, peppers, squash or peas.
  • Before garnishing the soup with the plain Greek yoghurt, consider adding another level of flavour by mixing it with lime juice, chopped fresh cilantro or ground cumin.

Tuesday 15 March 2016

Turkey, Asparagus, Corn and Onion Quesadillas


When I took the package of turkey breast fillets out of the freezer, I didn't pay attention to how small they were; when it was time to make dinner I had to try and figure out how to make two small pieces of turkey (about 12 ounces) into a meal for four people.

Pasta was out of the question, as I had none in the house. I had some asparagus that I wanted to use, as well as a piece of white cheddar. The last few tortillas in the package made the decision for me...quesadillas it was! The perfectly ripe avocados could also be used, as well as the grape tomatoes. This was working out really well.

Marinating the turkey in some buttermilk and sriracha added flavour; I also added some sriracha to the onions once they were cooked. I added some corn, and we ended up with a tasty dinner...not bad for making it up as I went!


In a shallow dish, combine:

1 cup buttermilk
1 teaspoon sriracha
1 teaspoon ground cumin
Juice of 1 lime
Pinch of salt and pepper


Make 3 diagonal slashes across the skin side of the turkey breast fillets, about 1/4" deep.

Place the turkey into the buttermilk marinade, and leave for at least 30 minutes.


 Heat the oven to 350F.


Toss together:

1 cup frozen corn
18 asparagus spears, cut into 1" pieces
1/2 teaspoon ground cumin
Salt and pepper
1 tablespoon avocado oil

Roast until the corn and asparagus start to colour slightly. Remove from the oven and allow to cool.


Thinly slice:

1 medium onion

Cook over medium low heat, with a drizzle of avocado oil, until the onion is softened and caramelized.


Remove the onion from the heat and stir in:

1 teaspoon sriracha

Set aside until needed.


Using a bit of avocado oil, cook the turkey breast over a medium high heat.

When the turkey is fully cooked, remove it from the heat and allow it to rest for 10 minutes, before thinly slicing.


Turn the oven on to 325F. Have a couple of baking sheets ready. Time to assemble the quesadillas:


Spread a layer of onions over the bottom of 3 tortillas.


Top with asparagus and corn.


Next divide the turkey between the 3 tortillas.


Finish the quesadillas off with a layer of grated white cheddar.


Place a second tortilla on top, and carefully lift the quesadillas onto the baking sheets. Place into the oven to bake. You want the filling to be hot, with melted cheese, and the tortillas to be soft with a slight crisp to the edges.

Remove the quesadillas from the oven and cut into six pieces. I served them with a grape tomato salsa, and some fresh guacamole.


  • I used 10" flour tortillas, as I have these in the house to make wraps for lunches, and my daughters like to make breakfast burritos with them too. Any size or type of tortillas will work.
  • Marinating the turkey in buttermilk helps to tenderize it, as well as add an extra layer of flavour. It is not an essential step. If you are short of time, rub some ground cumin and sriracha onto the turkey and cook it.
  • Turkey breast fillets are about the same size as chicken breasts, and have a similar tenderness, so this gives an easy substitution.
  • Cooked and shredded or diced turkey or chicken can be used as well. If you prefer, use pork, beef or fish.
  • When fresh corn on the cob is in season, grill some and then cut the kernels off and use those in your quesadilla. The asparagus spears can also be grilled, and then cut into smaller lengths. The reason I cut them into smaller pieces is that it makes eating the quesadilla easier.
  • Once the onions are caramelized they become soft and sweet, which contrasts nicely with the spicy sriracha. The amount of sriracha can be increased or decreased. Chipotle chilies in adobo sauce would make a nice addition to the quesadillas.
  • The choice of cheese depends on what you have available, as well as what you like. I had a piece of white cheddar that was perfect for grating and using up in this recipe. Other cheeses that would work well are yellow cheddar or pepper Jack.
  • Cream cheese can be mixed with all of the other ingredients to make a rich creamy filling, which you can spread over the tortillas, instead of adding each item as a separate layer.
  • To make the guacamole cut an avocado in half, remove the pit and scoop out the flesh. Mash it with lime juice, salt, pepper and chopped cilantro. Purchased guacamole can also be used; you can also just dice the avocado and serve that on the side.

Thursday 10 March 2016

White Chicken Chili in a Bread Bowl


The day old buns, the frozen pinto beans, a slice of bacon, a lime and some chicken thighs turned into this delicious white chicken chili, that I served in bread bowls. It was a nice change from the usual tomato based chili, but still had the spiciness I associate with chili, as well as the sweetness of the corn.

Making the bread bowls is simple, and adds a fun touch to the meal, but my  buns were on the small side, so everyone had to go back for seconds, and in some cases thirds! The bonus of being able to eat your bowl, that has soaked up all the flavours of the chili makes up for this minor inconvenience!

I used the inside of the buns as a thickener for the chili, so nothing went to waste. 

To make the bread bowl, pre-heat the oven to 325F and have a baking sheet ready.


Use a small sharp knife and cut a lid in the top of your buns, removing it and then gently pulling out the soft bread from the inside of the bun.

Make sure to leave at least 1cm around the side so your bowl is able to hold your chili long enough for you to eat it.


Place the bowls and lids onto the baking sheet and place in the oven to dry out and crisp up.

Keep an eye on them; they should take about 20 minutes. You are looking for them to be dried out and crunchy.

Remove from the oven and allow them to cool while you make the chili.


In a shallow dish, combine:

Juice and zest of 1 lime
2 tablespoons of avocado oil
1 teaspoon chili powder
1 teaspoon ground cumin
1/2 teaspoon oregano
1/2 teaspoon ancho chili powder
1 teaspoon garlic powder
Pinch of salt and black pepper


Add:

12 boneless, skinless chicken thighs

Make sure the chicken is well coated with the marinade, and leave it for 30 minutes.


Break the reserved bread into small pieces, and soak it in some chicken stock.

I had:

2 cups bread
1 cup chicken stock

This will be the thickener for the chili.


In a deep sided pan, sear the chicken on all sides. No oil is needed, because of the avocado oil in the marinade.

Remove the chicken and set aside.


Dice:

1 slice of bacon

Add this to the pan and cook until it starts to crisp.


With the heat on medium, add:

1 medium onion, sliced
3 cloves of garlic, minced

Cook until the onion starts to soften, stirring often.


Add the seared chicken back to the pan.


Add enough chicken stock to the pan to almost cover the chicken. I used :

3 cups

Bring to a boil, cover and simmer until the chicken can easily be shredded, about 45 - 60 minutes.


Remove the chicken from the pot, and using two forks, shred it. Add the chicken back to the pot.


Add:

1 cup corn kernels
1 cup pinto beans

Stir the soaked bread into the chili, a little bit at a time, until the chili has reached the desired consistency. Taste and adjust seasoning.


To serve, place a bread bowl into a shallow bowl, and fill it with chili. Top with grated cheese, diced avocado and sour cream.


  • This chili can be made using leftover cooked chicken...shred it and make the broth by adding the marinade spices to the onions and garlic instead of to the chicken.
  • You could make this with ground chicken or turkey; turkey legs (they will take longer to cook) or pork.
  • I used ancho chili powder, but I think that chipotle chilies in adobo sauce would add heat and smokiness to the dish. You could also use dried chipotle, or canned green chilies.
  • Avocado oil is not essential, I like the flavour it adds, but olive oil or vegetable oil are good substitutions.
  • If you do not want to use the bread to thicken your chili, add less chicken stock and allow the liquid to reduce if needed. 
  • Freeze the bread for another use, or turn it into bead crumbs or bread pudding.
  • To make the bread bowl you need to have crusty bread or buns, such as sourdough, French or Calabrese, in order to have a sturdy enough bowl. Other serving options (other than straight into a bowl) include in a tortilla shell bowl or taco shells.
  • The bacon is optional; I used it because it was in the fridge for some strange reason. It added some smokiness and saltiness.
  • I would like to add red peppers the next time I make this. It will add colour and another dimension of flavour.
  • If you like cilantro, chop some up and add it just before serving.
  • The type of bean ypou add is up to you...I had pinto beans in the freezer. Since this is a white chili, I would personally stay with white beans...navy, pinto, cannellini, white kidney or romano.
  • The chili can be made a couple of days ahead, it can also be frozen.