Wednesday 27 May 2015

Baked Sole with Spinach and Sundried Tomato Pesto


I wanted to use the frozen sole, but was trying to think of something different to do with it. I had fresh basil, a few pinenuts and some sundried tomatoes, so I decided to make sundried tomato pesto. I added in fresh spinach and parsley and used some of the oil from the sundried tomatoes, instead of just olive oil. This added a nice kick to the pesto, which offset the mild flavoured fish.

My first thought was to spread the pesto onto the sole and roll the fillets up, but then I had this idea...I spread it onto one fillet and topped it with a second, before baking them.

Heat the oven to 350F and start by making the pesto.


In a food processor, combine:

1/3 cup fresh basil leaves
1/3 cup fresh spinach
1/4 cup fresh parsley
2 cloves garlic, minced
2 tablespoons sundried tomatoes, roughly chopped or sliced
1 tablespoon pinenuts


Process until you have a chunky paste. Then add:

2 tablespoons of sundried tomato oil
4 - 6 tablespoons of olive oil

Process until you have a slightly chunky pesto. Taste and season with salt and pepper.


Lay half of the sole fillets in an ovenproof dish. Season lightly with salt and pepper, and a bit of lemon juice.

Spread some of the pesto over each fillet.


Lay another sole fillet on top of the pesto.

Lightly season this with salt and pepper, and a bit of lemon juice.


Place the dish into the oven and bake until the fish is cooked; this took about 8 - 10 minutes.


I served the fish with some boiled new potatoes and sauteed snow peas. Drizzle the pan juices over the fish.


  • The amount of oil you add to the pesto depends on how thick you want it. I left mine chunkier than I normally would when making Basil Pesto. 
  • If you have sundried tomatoes that are not packed in oil, but are re-hydrated in hot water, use only olive oil.
  • As I mentioned, the pesto can be spread onto each fillet, which can then be rolled up and baked. Other vegetables can be added before rolling the fish...asparagus, thinly sliced zucchini, fresh green beans.
  • If you have a thicker fish such as cod, halibut or salmon, just spread the pesto over the top before baking. It can also be served on the side as a sauce if you are grilling the fish.
  • Extra pesto can be added to chicken salad for sandwhiches or wraps, which is what my husband did for his lunch today. It can also be tossed with hot pasta...add some cooked chicken or vegetables and sprinkle with grated Parmesan or crumbled goat cheese.
  • The pesto will keep for 3 days in the fridge; it can also be frozen in ice cube trays and then stored in re-sealable bags for another time.
  • Add the pesto to cream sauce or bechamel when making lasagne.
  • Toss potatoes with the pesto before roasting.
  • Don't limit yourself to fish...use the pesto with chicken. Stuff it under the skin of a whole chicken before roasting; spread it onto, or stuff it into, chicken breasts; use it as a marinade for chicken kebabs.
  • The choice of only basil, or basil and spinach is up to you. I like to add spinach as it's another way to get that extra bit of vegetable into us! Any other herbs can be used as well...cilantro, oregano or arugula.
  • By sandwiching the sole fillets together I created a thicker piece of fish that took longer to bake. I find this is a good thing to do as it is very easy to overcook the thin fillets.
  • Other vegetables can be added to the layers of pesto...try grilled zucchini or asparagus.
  • If you have fresh fish that you want to freeze, sandwiching it with the pesto is quick and easy to do before putting it in the freezer. You then have an easy meal ready to go.

Friday 22 May 2015

Asian Style Salad Rolls with Barbecue Pork


I was tempted to buy some sheets of rice paper and some rice noodles last time I was grocery shopping. I had a hankering for Asian salad rolls. I haven't made them for years; we used to make them at the catering company I worked for just after I finished culinary school. I remembered the basics, and worked from there.

I had a few problems rolling them, they just wouldn't stay as tightly rolled up as I would have liked! So it was a bit of a messy dinner, but very yummy!


Start out by marinating the pork tenderloin. I had 2 small tenderloins, but that gave us leftovers for lunch...two days in a row!


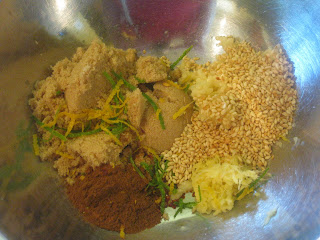
 In a small bowl, combine:

2 cloves garlic, minced
1 - 2 teaspoons minced fresh ginger
zest of half a lime
zest of half a lemon
1 tablespoon toasted sesame seeds
1/2 teaspoon Chinese five spice
pinch of chili flakes
3 tablespoons brown sugar


Add:


1/4 cup soy sauce
1/4 cup dry sherry
2 teaspoons sesame oil
4 teaspoons olive oil

Whisk together to combine.


Place the pork tenderloin into a resealable bag and add the marinade.

Close the bag, pressing out as much air as you can. Refrigerate for at least 6 hours.


Grill the pork, reserving the marinade.

Put the marinade into a small pot and bring to a boil. Boil for a couple of minutes.


When the pork is cooked, and has rested for 5 - 10 minutes, thinly slice it and set it aside while you prepare the other ingredients.


Break the rice noodles up into smaller pieces if you like. Place them in a bowl and cover with boiling water. Leave them to sit and soften, this takes about 10 - 15 minutes.


When the noodles are ready, drain the excess water off and toss them with the boiled marinade. Just add enough to coat the noodles. If you have any left, throw it out.


Prepare the other salad roll fillings. I used:

sliced avocado
grated carrot
baby romaine lettuce


thinly sliced green onions
sliced red pepper
sliced cucumber


Now to assemble the salad rolls...Have a large shallow dish of warm water ready to soak the rice paper, as well as all of the filling ingredients, and a dish to put the ready to eat salad rolls onto.


The rice paper rounds I bought were about the same size as a 10" tortilla. They are quite brittle, so handle them carefully.

Lay one piece of rice paper into the warm water, and leave it to soak until it starts to soften and become pliable, anywhere from 15 - 30 seconds. Remove it from the water and lay it on the counter. Add the next piece to the water while you fill and roll the first.


Layer the fillings in the centre of the rice paper.

Place the meat on the bottom.
Then add the vegetables.


Lastly add a layer of rice noodles and then top that with lettuce.


Roll everything up by pulling the long side closest to you over the filling.

Tuck the sides in.

Roll up, holding the filling in as you go, until you have your salad roll.


Serve the salad rolls with peanut sauce, sweet chili sauce, soy sauce or any other favourite dipping sauce.


  • Since I made these I found out that part of the reason I had a hard time rolling them up nice and tight was because I added the marinade to the noodles. I did that to add another layer of flavour. The rolling is easier when the noodles are left plain and stick together a bit; this helps to hold it all together as they also stick to the rice paper. Despite being a bit messy to eat, they still tasted good!
  • Use leftover cooked chicken, pork or beef. Use cooked shrimp or prawns. Any meat works, and using up leftovers is what meals like this are all about.
  • The vegetables are your choice. Green onions and carrots are a good base to work with; add other available or favourite vegetables. Cutting the vegetables into small pieces is key; they are difficult to eat when they are cut into large pieces.
  • Try the following: bean sprouts, snow peas, enoki mushrooms or thinly sliced mushrooms, finely shredded Savoy cabbage or spinach.
  • Tofu can be used instead of meat. Dice it and marinade it before cooking it, either stir fried or roasted. This allows the flavours of the marinade to penetrate.
  • If you make the salad rolls ahead of time, make sure they are well wrapped so that the rice paper doesn't dry out.
  • Extra noodles can be served as salad for lunch. Toss with chopped fresh vegetables such as cucumber, carrots and cherry tomatoes and add in a bit of the meat if you also have some leftover.
  • For an easy peanut sauce, see the post Coconut and Lemongrass Brined Pork Tenderloin with Asian Noodle Salad.


Wednesday 20 May 2015

Corn, Tomato and Avocado Salad


Even though it is only the middle of May, it feels like summer has arrived. We are having amazing weather right now, and eating dinner outside is a great way to end the day.

I have started to make more salads, and this one was a hit. It was also a quick and tasty way to use some of the cherry tomatoes and the half avocado I had.


In a large bowl, combine:

2 cups frozen corn, defrosted
1 cup halved cherry tomatoes
2 green onions, thinly sliced


Add:

1/2 avocado, diced
1/4 teaspoon ground cumin
pinch of chipotle chili powder
salt and pepper to taste


Dress the salad by adding fresh lime juice and avocado oil to taste. I went light on the oil, just enough to coat everything lightly.

Serve right away, at room temperature, or chill and serve later.


  • The amounts in a salad like this depend on you...which vegetable you like most, or which one you have more of.
  • As soon as corn on the cob is in season, grill some and cut the kernels off the cob and use in the salad instead of frozen corn. This will add a lovely smoky sweet flavour.
  • The tomatoes I was using were a mixture of colours, red, yellow and green.
  • If the other family members didn't dislike cilantro so much I would have chopped some and added it. Fresh chives or chopped fresh parsley would brighten the salad up if you have some.
  • Add chopped cooked chicken to the salad, omit the avocado. Cut an avocado in half, carefully remove the pit and then stuff the cavity with the salad for a light lunch. Cooked shrimp or lobster meat can also be used this way.
  • The salad can be used as a salsa to accompany grilled fish. It can also be used in tacos or wraps (which is what I did, together with the leftover flank steak).
  • To turn this into a salad entree, add black beans, diced red pepper, leftover meat such as chicken, pork or beef and some cheese. Add a warm tortilla or crusty bread and you have a quick and easy lunch or dinner.

Monday 18 May 2015

Roasted Cauliflower Soup with Grilled Cheese Sandwhiches


From this, roasted cauliflower with a honey thyme yoghurt crust...
To this, roasted cauliflower soup with a grilled cheese sandwhich on sourdough bread! 

The cauliflower I bought was absolutely huge, so I knew it would be good for at least two meals. I had a bit of plain Greek yoghurt, and some honey so I roasted it with a yoghurt crust. This keeps the moisture inside the cauliflower and it basically steams and becomes tender on the inside, but forms a nice crust, full of flavour on the outside.

This was used as a vegetable one night; the leftovers became soup. I used the little bits and pieces of cheese to make grilled cheese to serve with the soup. All in all, that head of cauliflower was a great buy!

Start off with the roasted cauliflower...


Remove the leaves from your cauliflower.

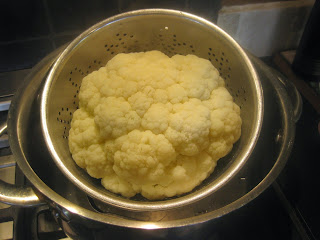
Place it in a large pot of cold water. Bring it to a boil and allow it to cook for 5 minutes, before turning the cauliflower over and cooking for another 5 minutes.


 Remove the cauliflower from the water and allow to drain and cool in a colander, while you mix the yoghurt and honey.

Heat the oven to 350F.


Combine:

1/4 cup plain Greek yoghurt
1 teaspoon chopped fresh thyme
1 teaspoon honey
1 teaspoon olive oil
salt and pepper to taste


Place the head of cauliflower in an ovenproof dish. Coat the entire outside with the yoghurt mixture.

Place in the oven and roast until the centre of the cauliflower is tender when pierced with a fork or skewer. This took about 45 minutes.


To serve, cut wedges out of the head of cauliflower.


The leftover cauliflower can be stored, well wrapped, in the refrigerator for 2 - 3 days. Then it's time to make the soup...making the soup allowed me to use the open chicken stock as well as some Parmesan rinds that were in the fridge.


Dice a small onion, and cook in olive oil until softened.


 Add:

1 large russet potato, peeled and diced
salt and pepper


Add:

3 cups chicken stock

Bring to a boil.


Add the leftover roasted cauliflower. I had half the head of cauliflower, 4 - 5 cups.

Add more chicken stock or water, so that the vegetables are completely covered.

Bring to a boil and then simmer until the potatoes are tender.


Remove from the heat and puree, using a hand blender, food processor or blender.

Strain to remove any lumps, leaving you with a silky smooth soup.


Return to the pot and thin to the desired consistency by adding milk.

Heat gently while making the grilled cheese sandwhiches; taste and adjust seasoning before serving.


I had a small piece of Brie, some orange cheddar and some Swiss cheese.

I added some white cheddar and roasted garlic Havarti.


Grate the cheeses (slice the Brie) and mix them so you have a blend.


Butter the outside of the sourdough bread, and mound the grated cheese and a couple of slices of brie onto one side of each sandwhich.


Cook in a non stick pan until crispy on the outside and the cheese is melty and gooey on the inside.


Cut the grilled cheese in half and serve alongside a bowl of the cauliflower soup. The sandwhich is great for dipping into the soup!


  • The soup can be made with raw cauliflower, cut into florets and cooked with the potatoes until tender. The roasted cauliflower adds the extra flavour from the yoghurt crust and the roasting.
  • Broccoli can also be used, with the cauliflower, or instead of the cauliflower.
  • Blue cheese is a great pairing for cauliflower; consider using it in the grilled cheese, or adding it to the soup as a garnish.
  • I used part chicken stock and part water. You can use whichever you have; milk or whipping cream can also be used for the cooking and the thinning out. Whipping cream will, of course, give a much richer soup.
  • The sandwhiches can be dressed up by adding ham or cooked bacon; dried cranberries or cranberry relish; mustard; pesto; tomatoes or roasted garlic mayonnaise.
  • The yoghurt can be mixed with anything you like. Try some of these...tandoori spices, curry powder, fresh herbs, lemon zest; fresh or roasted garlic.
  • The roasted cauliflower can also be diced up and served cold as a salad. Add toasted nuts, chopped fresh herbs and a light olive oil and citrus juice dressing. Dried fruit is also a great addition, as is crumbled blue cheese.
  • Leftover roasted cauliflower can be diced up and added to pasta or stir fry. It can also be cooked with potatoes and mashed. 
  • The soup can be made ahead and frozen.


Saturday 16 May 2015

Artichoke, Spinach and Goat Cheese Stuffed Pasta Shells


The fresh spinach that was in the fridge needed to be cooked as it was losing it's crispness. I was going to freeze it for another time, but was inspired by a recipe in Deb Perelman's book 'The Smitten Kitchen Cookbook'. The recipe was for stuffed jumbo pasta shells, a kind of warm artichoke dip in pasta.

I used the idea and enlarged on it by using the cooked spinach, and the goat cheese that was in the fridge. It was easy to put together, and some of the steps can be made ahead. The dish was pretty rich, but the tanginess of the goat cheese and the acidity of the artichoke hearts cut through the creaminess of the sauce. It was absolutely delicious, and my daughter has already asked when we're having it again!

I wilted the washed fresh spinach in a large, dry pan, allowing the water than was left on the leaves to help steam it. Allowing it to cool in a strainer also allows some of the excess moisture to drain out. The rest can be squeezed out. Roughly chop the spinach and set aside.


To make the filling, dice and cook:

1/2 medium onion

Cook until the onion is soft and starting to colour.


Drain and chop:

1 can of artichoke hearts.

Add them to the onion, along with:

2 cloves garlic, minced
salt and pepper to taste


Cook the artichokes and onions for a couple of minutes. Add 1/4 cup of white wine (I still had a little bit of that Chardonnay to finish up). Cook, stirring often, until the wine has all reduced away. Remove from the heat and allow to cool.


In a large bowl, combine the following:

1 cup chopped, cooked spinach
1/2 cup soft goat cheese
1/2 cup cream cheese
1 tablespoon chopped fresh parsley


Add the cooked onions and artichokes to the cheese mixture. Mix well to combine.

Taste and adjust seasoning. Set aside until needed.


In a large pot of boiling, salted water cook:

16 jumbo pasta shells.

When they are slightly underdone, drain and rinse under cold water to stop them from overcooking. This also makes them easier to handle while stuffing!


Make the sauce:

In a heavy bottomed pan, melt:

1/4 cup of butter

Stir in:

1/4 cup of flour

Cook for a couple of minutes, stirring.


Gradually whisk in:

2 cups milk

Continue to whisk until the sauce begins to boil. Allow it to boil for about a minute.

Remove from the heat. Season with salt and pepper to taste.


Whisk 1/2 cup of ricotta cheese into the sauce.


Heat the oven to 350F.

Spread 2/3 of the sauce onto the bottom of an oven proof dish.

Sprinkle with a bit of grated Parmesan.


Using a spoon, stuff the filling into the cooked pasta shells. Lay the shells on top of the sauce.
Drizzle the remaining sauce over the top of the shells. 

Sprinkle with grated cheese. I used Parmesan and Asiago.


Bake until the filling is heated through, the sauce is bubbling and the cheese is golden. This took about 30 - 40 minutes.


  •  Jumbo pasta shells can be difficult to find sometimes, so cannelloni can be used instead. The filling could also be alternated with the sauce and lasagne noodles to make a vegetarian lasagne.
  • If you have other fresh herbs, use them. Basil would be really nice, as would thyme. 
  • The ratio of cream cheese to goat cheese can be played around with to suit your taste. If you use more, or only, cream cheese consider adding some lemon juice to the filling. This will cut some of the richness, the way the goat cheese does.
  • The filling and sauce can be made ahead, and the pasta can also be cooked ahead. The whole dish can be assembled ahead of time too; keep refrigerated. It can also be frozen once it is assembled.
  • Other vegetables can be added...cooked kale, sundried tomatoes, olives or red peppers.
  • The filling can be used as a warm dip by putting it into an ovenproof dish and baking it until it is hot and bubbly. Serve with crusty bread or crackers.